Happy Easter 2019 – Pretty Pink Posh

Happy Easter to All!

I cannot wait to see the happy face from my daughter when she see the Easter Basket waiting for her in the morning. We usually do Easter eggs hunt at home, but I have this idea that we could go to a hiking place I just discovered to do a higher challenge of egg hunting. We will see if it goes well.

For today’s card, I wanted to keep the colors in traditional Easter colors which are Pink, Purple, Yellow and Blue. To build the front panel, I overlapped Pretty Pink Posh Stitched Diamonds Dies and die cut them from a piece of A2 watercolor paper. Then I lightly ink blended another piece of watercolor paper using Tim Holtz Distress oxide ink in Tumbled Glass and Picked Raspberry. I mixed Picked Raspberry ink with water and splattered over my front panel by tapped a paint brush. After I attached the inked background with foam tape, I set it aside to dry.

I pulled out my All Time Favorite Bunny Friends stamp set to stamp all needed images on Neenah Solar White 80lbs cardstock paper with Memento Rich Cocoa ink pad. Then I colored them with Copic markers and die cut with Coordinating Dies. I arranged them in and around the diamond frame that I created. I stamped the sentiment “happy easter” from Pretty Pink Posh Easter Eggs Stamp Set using purple dye ink. I did not want the sentiment to block too much of my background, so I hand cut the sentiment and attached it onto the lower part of diamond frame. At last, I added a few Sparkling Clear Sequins in the frame to finish my card.

I hope you all have a wonderful and blessed Easter day! I am currently working on Pretty Pink Posh new release products. I am sure you will be wowed!


Love you always-Pretty Pink Posh 3 days Sale

Happy Sunday!

I went hiking with my friends yesterday and it was amazing to see everything is green and springing. That was the inspiration for my card today.

To begin with,  I ink blended a piece of A2 sized paper with Tim Holtz Distress oxide ink in Pine needles and Cracked pistachio. Then I splattered water and white watercolor paint over the background.  I cut my shaker window using Pretty Pink Posh Storybook 2 Die. I added a piece of acetate paper underneath, poured Pretty Pink Posh 4mm Sparkling clear sequins/Mini Sparkling Clear Flowers,  and closed it with foam tape.

I pull out another piece of white card stock paper and cut a frame using Pretty Pink Posh Scallop Frames Die and attached it onto the top of my prepped background with Foam strips.

I stamped images from Beautiful Butterflies Stamp set onto watercolor paper using Versamark and heat embossed them using Glitter black embossing powder. I colored them with Tombow brush markers and cut with Coordinating Dies.  For my sentiment, I white embossed “Love you always” from Love Sentiment Stamp set onto a piece of black card stock paper and cut it with my paper cutter. I arranged them around my shaker window using Foam tapes and added Sparkling Clear sequins to finish my card.

I hope you all love my card and head out to Pretty Pink Posh Online Shop to receive great discount for all butterfly stamps and dies!

Happy Birthday-Guest designing for Penguin Palace

Good morning everyone,

I am guest designing for Penguin Palace, a newer stamp company with tons of cute stamps and dies. I have no resistance to everything  cute and fun. Hope you all like this card and don’t hesitate to check out their online shop.

To start with my card, I ink blended a piece of A2 sized watercolor paper using Tim Holtz Distress oxide ink in Worn Lipstick and Candied apple. To create better result of my color gradient, I also added Distress ink in Candied apple to the top of card. I splattered water and white paint over my inked background to create some textures.

I die cut a white frame using one of dies from Fancy Hearts Scalloped Borders and Dynamite Explosion Border set or 3 times and stacked them together with craft glue. Once that’s done, I  added this frame to the center of my background and set aside. I colored images from My Best Pal stamp set and die cut with coordinating dies. Then I colored them with copic markers. I tried to keep my main selected colors in Red, brown, blue and purple.

I adhered my colored images onto the background using Multi medium matte and foam squares and heat embossed the sentiment ” Happy Birthday ” with white embossing powder. I finally embellished my card with different sizes of white and red sequins.

I hope you like the products that I used for making this card and have a good inspiration day!

Pinkfresh Studio April Essentials Release Blog Hop

Welcome to Pinkfresh Studio April Essentials Release Blog Hop! After having lots of stamps and floral dies from January Release, don’t you wish that you could have some basic dies to build the foundation of your cards? Now you have it! Whole bunch of Essential dies are here waiting for you!

Today I am featuring the most basic and also the most important dies – Stitched Rectangles. They are simple and basic but somewhat unique to similar products on the market. It comes with 4 nested rectangle dies. Two of them are stitched and two are just simple rectangles. It gives us lots of potential to mix and match so we could achieve variety of shapes. The card I am showing you today is one of examples.

To prep my background, I ink blended an A2 sized watercolor paper (Canson XL) using Tim Holtz Distress oxide ink in Tumbled Glass and Faded Jeans. Then I splattered some water and white paints to create some textures. I left it aside to dry. I overlapped two of stitched rectangle dies from Stitched Rectangles Dies to cut out my frame from a piece of 100lbs white card stock paper.Then I attached it over my prepped background using Foam strips.

I stamped selected images from Embroidered Blossoms stamp set and die cut them using Matching Dies. Then I adhered all pieces to the lower right sided of my framed card using Multi Medium Matte and Foam squares.

For my sentiment, I picked the one from Heart and Soul Stamp set and stamped it with Memento ink Rich Cocoa. I added a few jewels as embellishments to finish my today’s card.


You are invited to the Inlinkz link party!

Click here to enter

GIVEAWAYS:

  • Pinkfresh Studio will be giving away the full April Essentials release on the Pinkfresh blog, and on our IG feed.
  • I will be giving away a $25 gift card on my blog post too. the winners will be picked from the comments below.
  • The winners will be picked and posted on Sunday, April 14th on our GIVEAWAY PAGE. You must check that page & claim their prize within 2 weeks.

SHOPPING PROMO:

  • Free House die with any purchase. There is no code necessary, and the die will automatically load into your cart.
  • Pinkfresh will also be offering free/discounted shipping from April 8-11th on orders $50+. They must use the code APRESSFREESHIP50. Shipping is free in the USA, and $5.50 off for our International friends.

Waffle Flower 2019 April Release Blog Hop + Giveaway


Welcome to Waffle Flower April Release and 5th Birthday Blog Hop! We got new stamps, you’ve already seen at creativation stamps and Back to Basics Dies this month.  I’ve made four cards to take you to a little tour of this month’s products.

<Card 1>

How many of your kids are doing sports? This stamp illustrated by Kamo is so adorable. It is very easy to make a birthday card or a deck of Gym party invitations out of it.

To start with, I stamped images from Tumble On stamp set and cut with Matching dies. Then I colored them with copic markers. You really don’t need to use lots of colors to blend since the images are cute enough to work with. I created the abstract patterns using washi tapes to mask the A2 sized watercolor paper and ink blended with Tim Holtz Distress oxide ink in Squeezed Lemonade and Worn Lipstick.

I arranged all colored images along the pattern I created and stamped the sentiments to finish my first card.


<Card 2>

Mother’s day is approaching. Giving a card with unique and interesting pattern would be a great idea.

First, I mixed Tim Holtz Distress oxide ink in Cracked Pistachio with water, then I applied it onto a piece of A2 sized watercolor paper using medium sized paint brush to create my background. To make it textured, I splattered some of water paint over it and let it set aside to dry.

At the meantime,  I stamped selected images from Grateful stamp set with Memento Tuxedo Black ink over Neenah Solar white 80lbs card stock paper and colored with Copic markers. I die cut them with Matching dies and adhered onto the background with Foam squares. At last, I stamped sentiment “Grateful” to the lower left corner of my card and added enamel dots from Up & Running Enamel Dots  to finish.


<Card 3>

April marks the beginning of baseball or softball season and we are ready to hit one out of the park with this fun stamp set.

I decided to make this card simple enough to duplicate. Since my daughter is a softball player, I made a softball coach Thank you card. To make my background, I ink blended the background with Tim Holtz Distress oxide ink in Cracked Pistachio. Then I cut out 2 pieces of wider strips to adhere onto top and bottom of my background so I would have a stage for soft girls to stay on. To create some dimensions, I did add some foam strips  underneath after I ink blended with Distress oxide ink in Wilted Violet.

I stamped out my images from Batter Stamp set and cut out with Matching Dies. Then I colored them with copic markers and added to my background. I cut out a speech bubble from Speech Bubbles Die and stamped the sentiment “Thanks coach” in it before I adhered it. I found these purple color enamel dots from Up & Running Enamel Dots which matches so well with the girls’ uniform color so I popped some of them around the frame to finish my card.


<Card 4>

For my last card, I used these  the cutest hamsters celebrating their co-workers in Office Birthday.

I got back to my all time favorite ink blending background technique this time. I ink blended my background using Tim Holtz Distress oxide ink in Mustard Seed and Worn Lipstick heavily. I then sprayed water over the background and dried it with a piece of paper towel.

I stamped my images from Office Birthday Stamp Set with Memento Tuxedo Black in and cut with Matching dies. Then I colored them with Copic markers and arranged onto the background using Multi Medium Matte and Foam squares. I stamped sentiment ” from all of us!” and embellished my card using purple color enamel dots from Up & Running Enamel Dots . Now you know this enamel dots set is so come in handy for all color matching requirements!

Please Hop with us

Waffle Flower 

Amy Rysavy

Keeway Tsao

Jessica Frost Ballas

Emily Midgett

Alix Davis

Kelli Cool  

JJ Bolton   

Caly Person

Channin Pelletier

Rebecca Keppel

Hop Prize:

To celebrate the blog hop, Waffle Flower is giving away $25 gift certificates to THREE lucky winners. You can leave a comment on my blog and along the hop by 11:59pm ET on 4/7/19 for your chances to win. Winners will be chosen at random from the comments left on any of the posts on this blog hop and will be announced on the Waffle Flower blog on 4/9/19.

Receive a FREE Mini Egg Die with orders at $50 or above. Limited 1 per customer; While supplies last; Valid through midnight 4/7/19.

Pinkfresh Studio 5th Birthday Blog Hop

Welcome to Pinkfresh Studio 5th Birthday Blog Hop! Hooray for Pinkfresh Studio for their accomplishments for the past 5 years. And here is for the next 5 years, 10 years and many more to go! My today’s card features some of new products that were released in January. Hope to inspire you before the new release coming up on board in a few days!

I did a little bit experiment this time. Instead of making my usual ink blending background, I chose one sheet of pattern paper from Pinkfresh Studio Everyday Musing’s 6×6 Paper Pad. I die cut it slighter smaller than A2 size and lightly inked the edge with Tim Holtz Distress oxide ink in Worn Lipstick to contour the frame. I adhered it onto am A2 card base and set aside.

Now I started to build my focal piece. I die cut the floral frame using Circle Frame with Botanicals Die out of piece of Pool Blue color cardstock paper.  Then hand cut a circle that fits underneath this frame out of a white cardstock paper. I ink blended this white cardstock paper using Tim Holtz Distress oxide ink in Squeezed Lemonade and Worn Lipstick. I stamped “Hooray” sentiment from Scripted Bold Sentiments 2 Stamp set with Versafine Tuxedo Black ink.

After attaching the frame over the bottom circle using Foam strips, I also adhered the whole whole thing to the center of my prepped card background. I stamped “It’s your day” from Scripted Bold Sentiments 2 Stamp set again over a piece of black cardstock paper using versamark ink and white embossed it to finish. I hand cut it into a skinny rectangle strip and placed underneath of my bigger sentiment using Foam strip.

It is embellishing time! I added yellow jewels around the frame and different sizes of sparkling clear sequins scattered in and around the frame. I hope you love this card! There are LOTS of talented designers are joining us. Be sure to check out their blogs to be inspired with overdosed inspirations!

Hop with us !

If you come from Enza Gudor‘ Blog, your next stop will be Elsie Robinson . Or check out the whole list below ( I am on the second page)

You are invited to the Inlinkz link party!

Click here to enter

GIVEAWAYS:

  • There will be (3) Grand Prizes picked from the Pinkfresh Studio blog: Liquid Watercolor full set, Set of our 3 current paper collections, and the entire April Essentials die release (will release the Monday after the birthday blog hop)
  • I will be also giving away a $25 giftcard on my blog post. The winners will be picked from all comments below.
  • The winners will be picked and posted on Sunday, March 14th on Pinkfresh Studio GIVEAWAY PAGE. You must check that page & claim their prize within 2 weeks.

SHOPPING PROMO:

There are two shopping promos during the celebration:

  • You will receive a free die (XO word) with any purchase. No code needed, the die will automatically load into your cart while supplies last.
  • Pinkfresh is also offering free/discounted shipping from April 5-7th on orders $25+. They must use the code FREESHIP5THBDAY. Shipping is free in the USA, and $5.50 off for our International friends.

Cards with Spring colors- Pinkfresh Studio

Hello Friends,

In case you haven’t gotten the chance to check out my newly cards made with Pinkfresh Studio January Product Release. There are some photos to lure you to head to HERE so you could find out more details about them including products I used and How to.

I believe most of us could not wait for Spring to come. For my first card I did a shaker card with different shades of pink colors. I use Adore Alpha Dies and Folk Element Dies.

For my second card,  I kept it fairly simple with green tones with Spring Floral Dies.

Again, Be sure to check out the Pinkfresh Studio Blog for details!

Pretty Pink Posh March 2019 Product Release Blog Hop

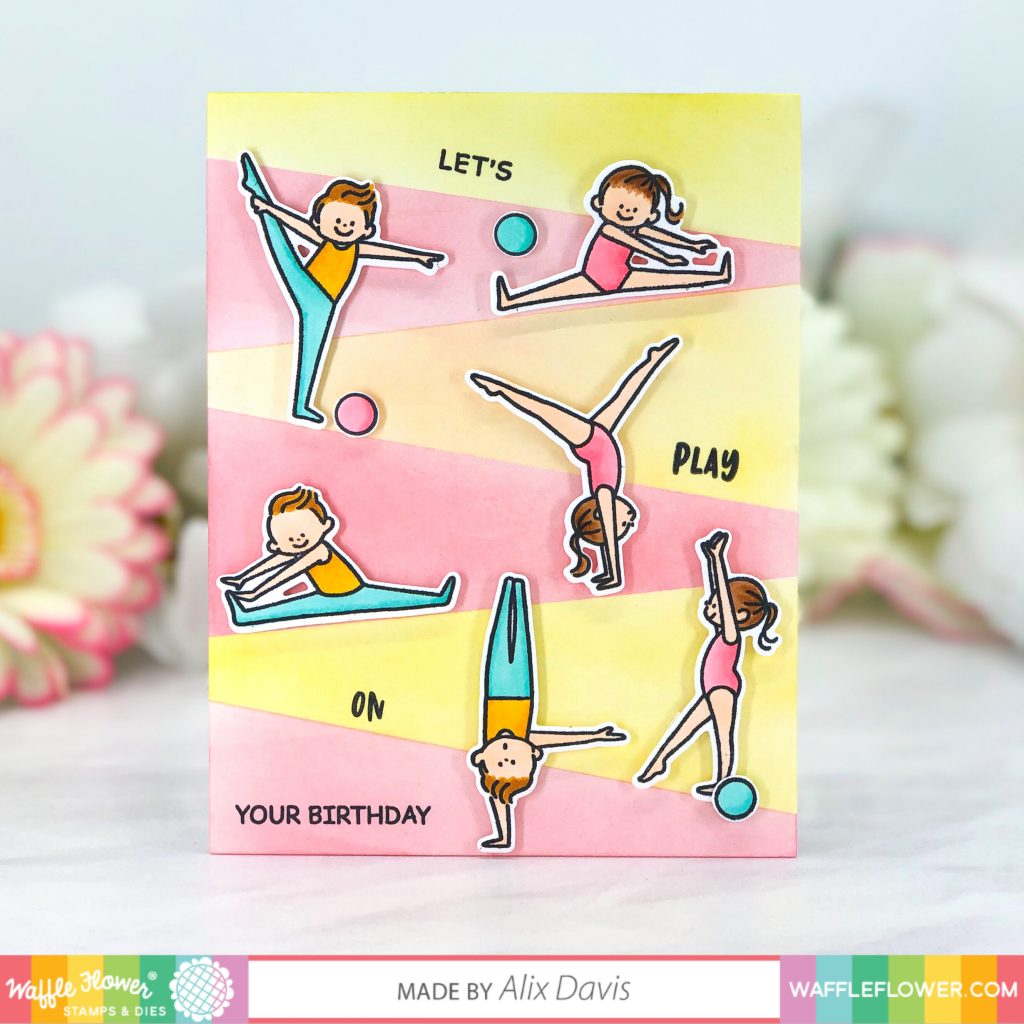
Welcome to Pretty Pink Posh March 2019 Product Release Blog Hop! Within this release, be prepared to be wowed by jam packed exciting products and loaded inspirations from all blog hops. I loved every single items from this release. It was so hard for me to pick a few to work with for this blog hop. I tried my best to present you with four cards I made before I overwhelmed you. Wink wink~

<Card 1>

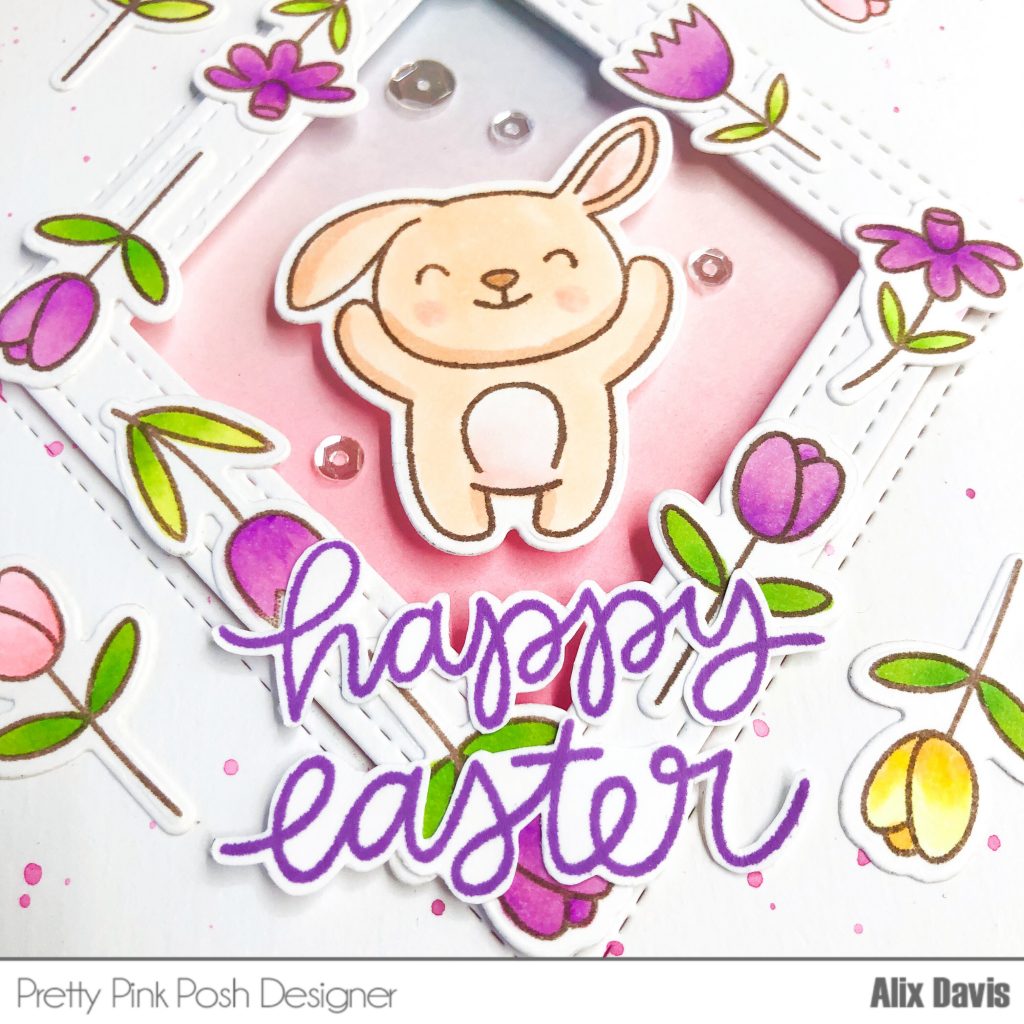
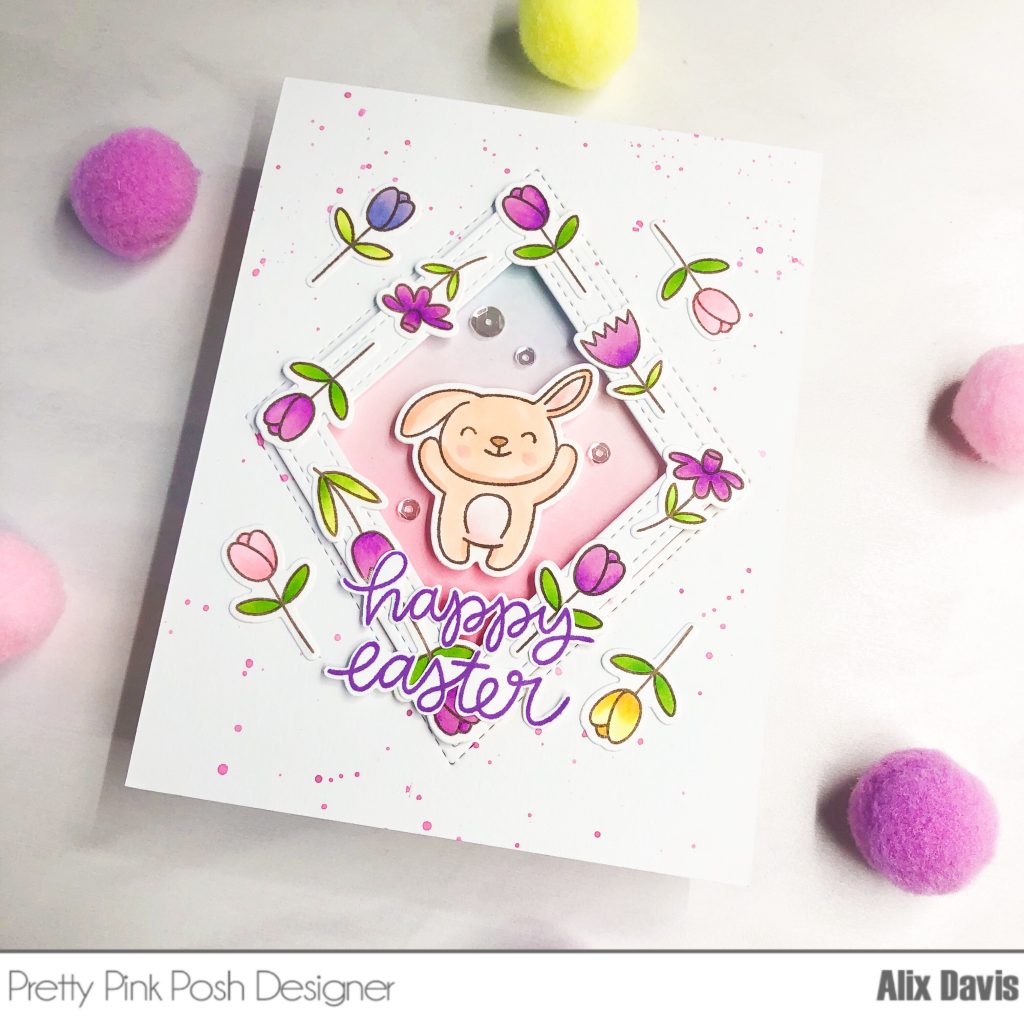
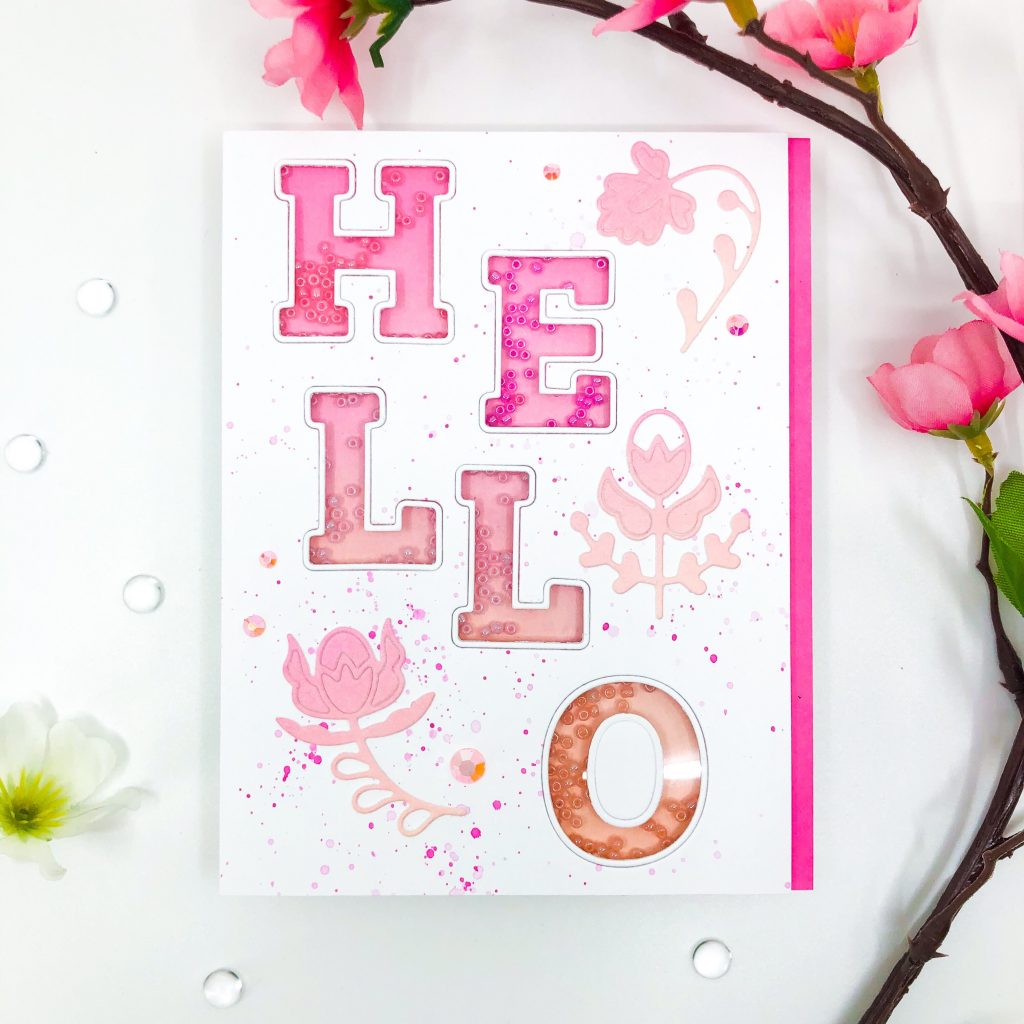
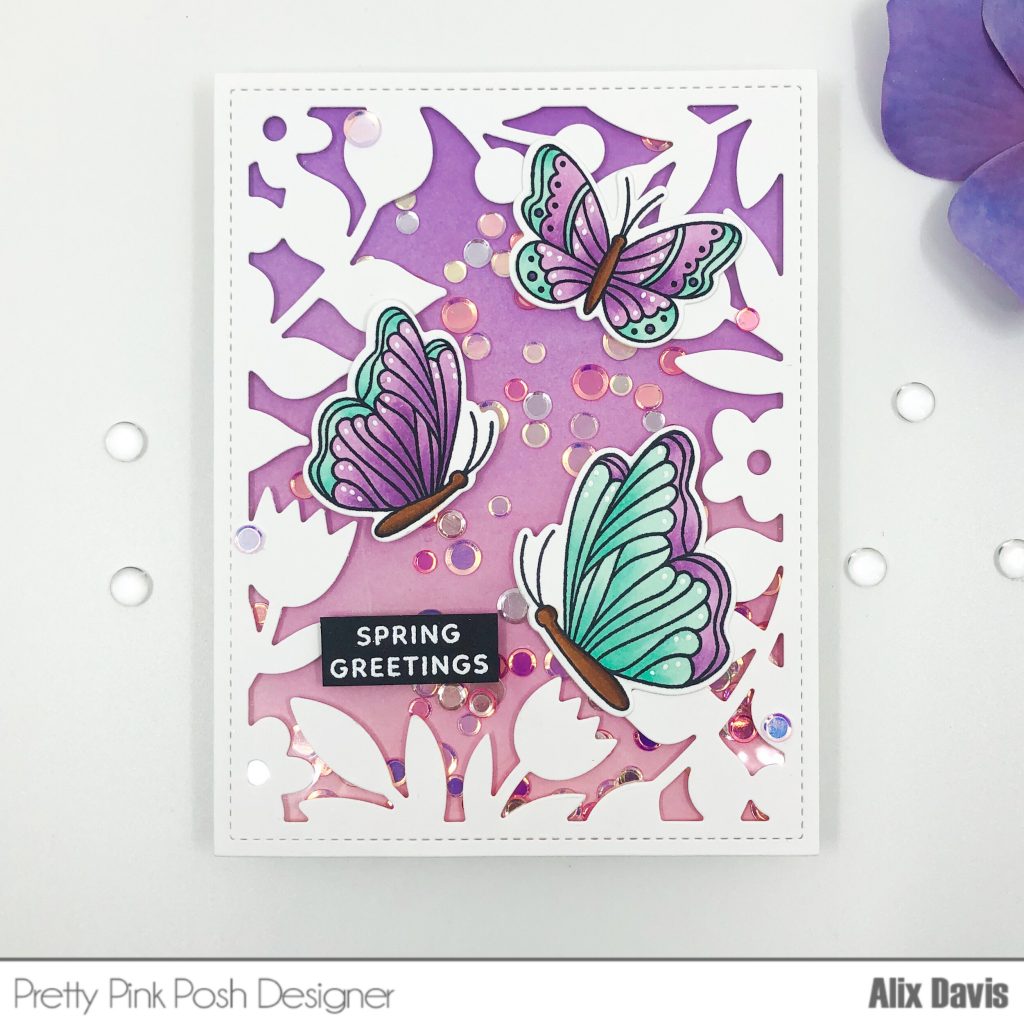
Spring is approaching. Why do I know? Oh yes. I am starting to have itching eyes and so as my daughter is. Take that downside away, I do love all beautiful things happening such as butterflies.  I started my first card with a shaker card.

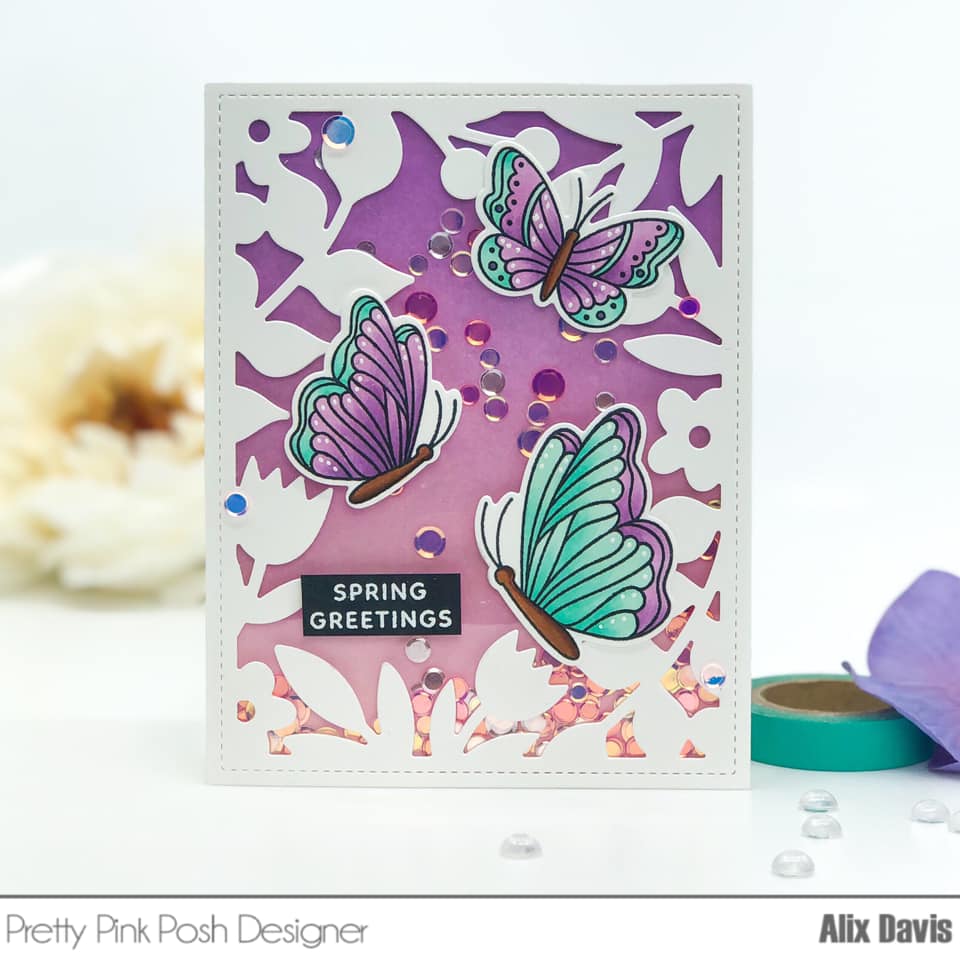
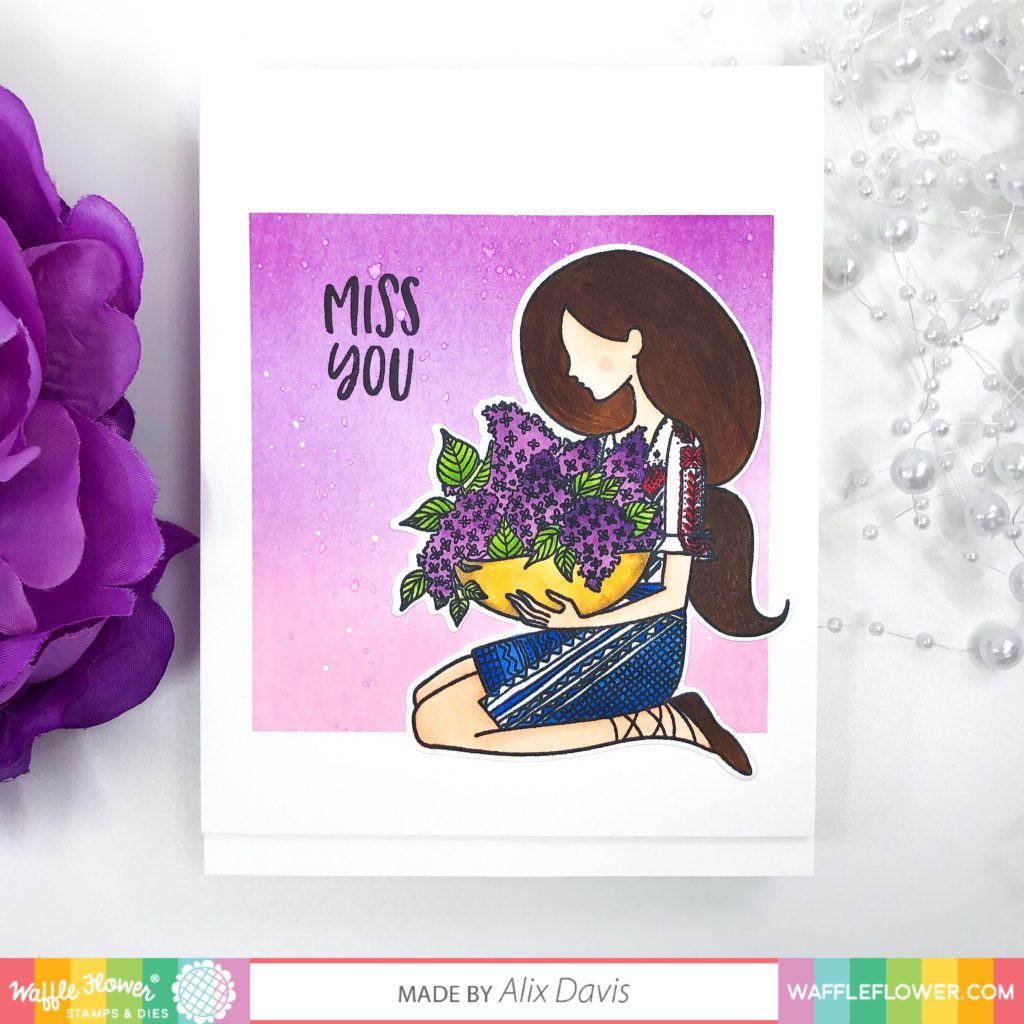
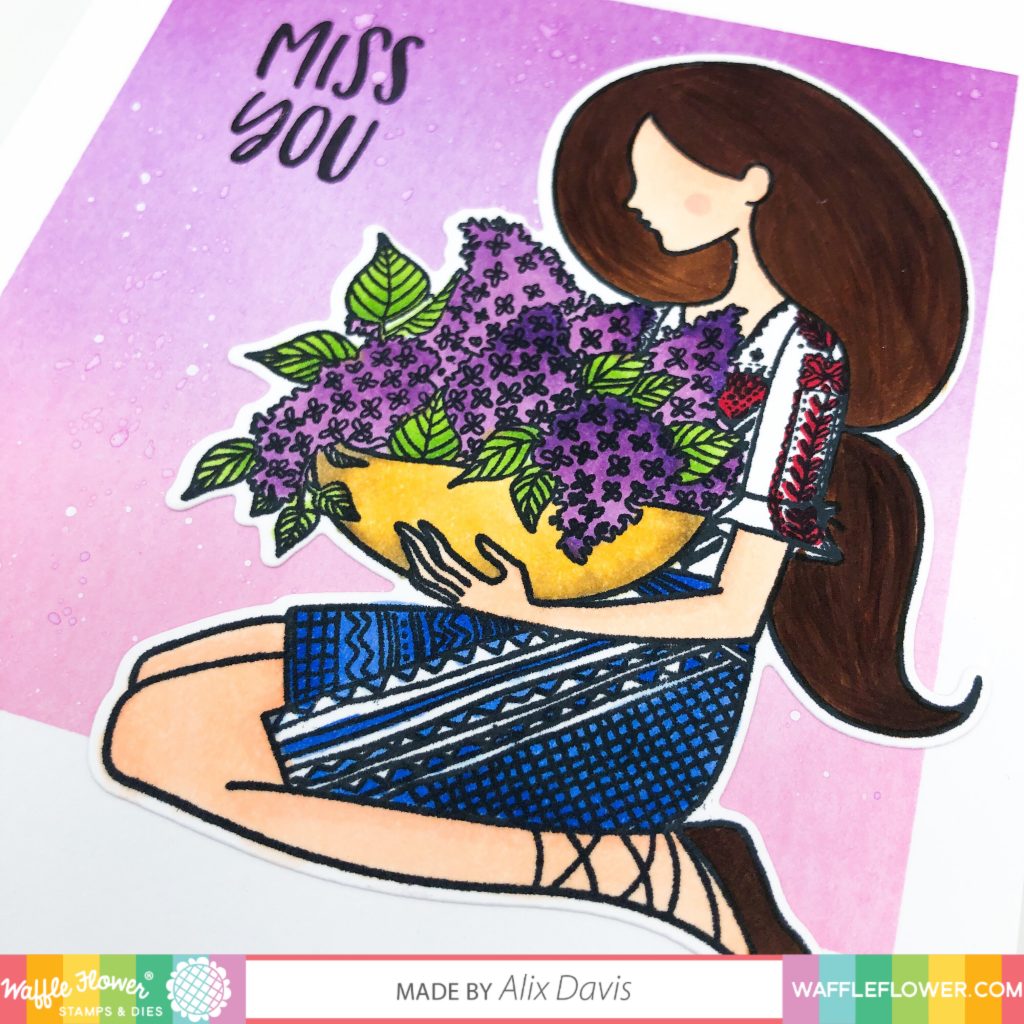
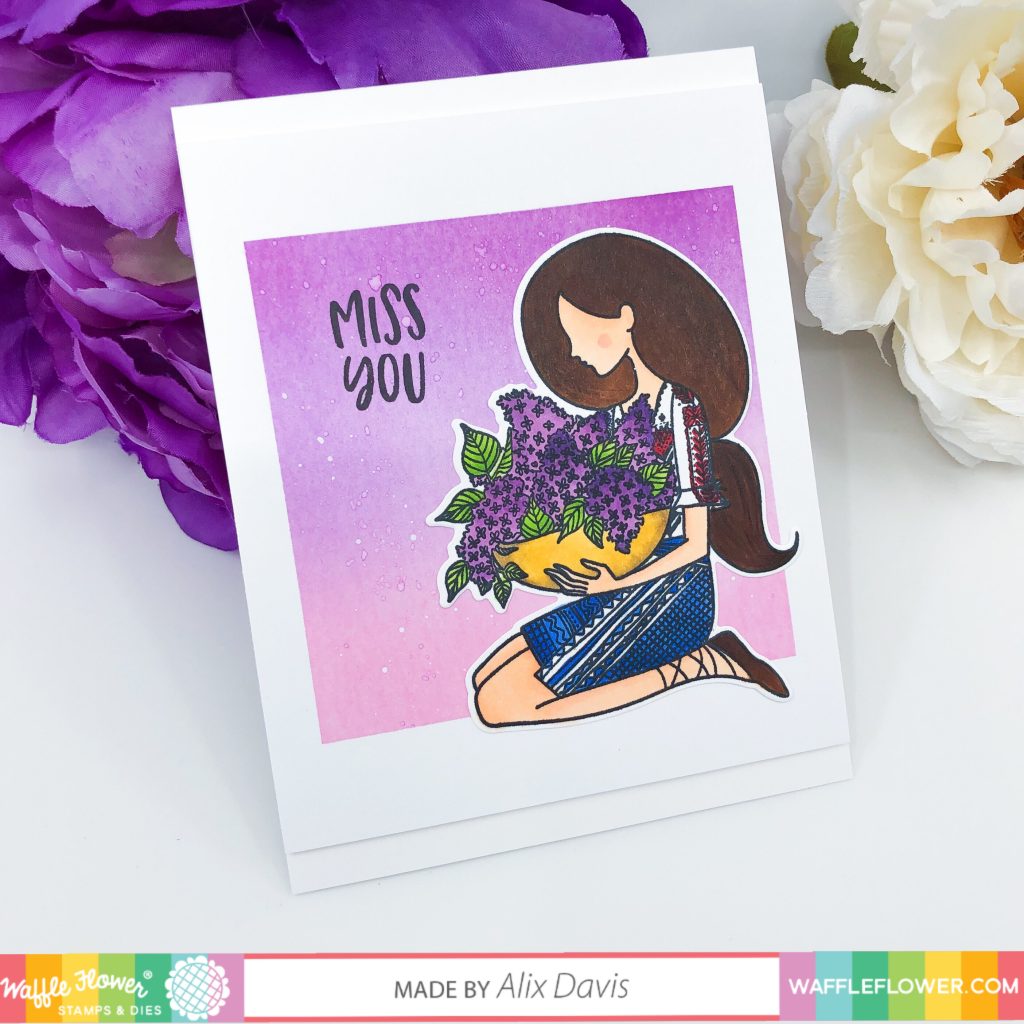
To begin with my card, I ink blended the background using Tim Holtz Distress oxide ink in Picked Raspberry and Wilted Violet over a piece of A2 sized watercolor paper. Then I die cut my front frame using Spring Frame Die out of white cardstock paper. I added a piece of acetate underneath the front frame and Poured lots of Friendship confetti Mix, then attached the frame over the background using Foam strips.

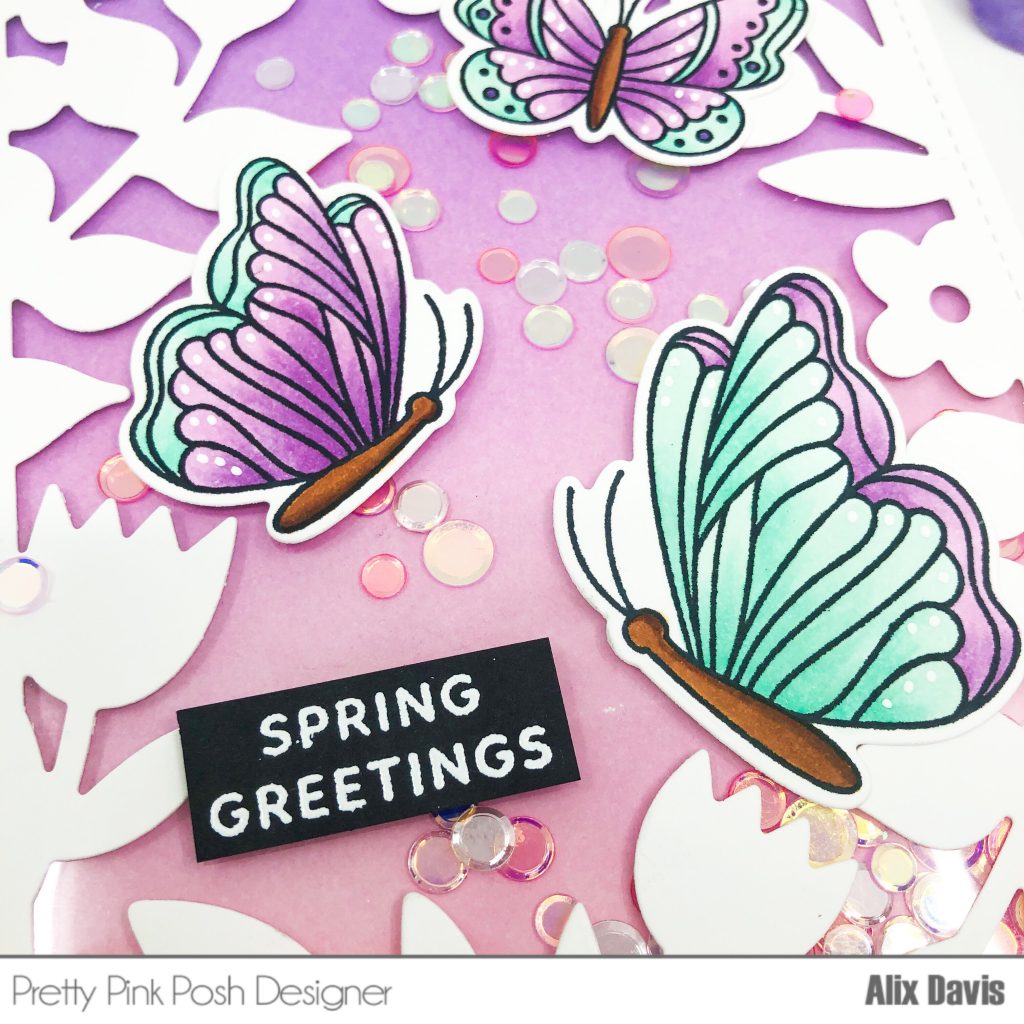
I stamped butterfly images out of Beautiful Butterflies Stamp set using Memento Tuxedo Black ink over Neenah Solar white 80lbs cardstock paper and cut them out with Coordinating Dies. Then I colored them using Copic markers ( BG 10, BG23, V01, V15, E33, E37)

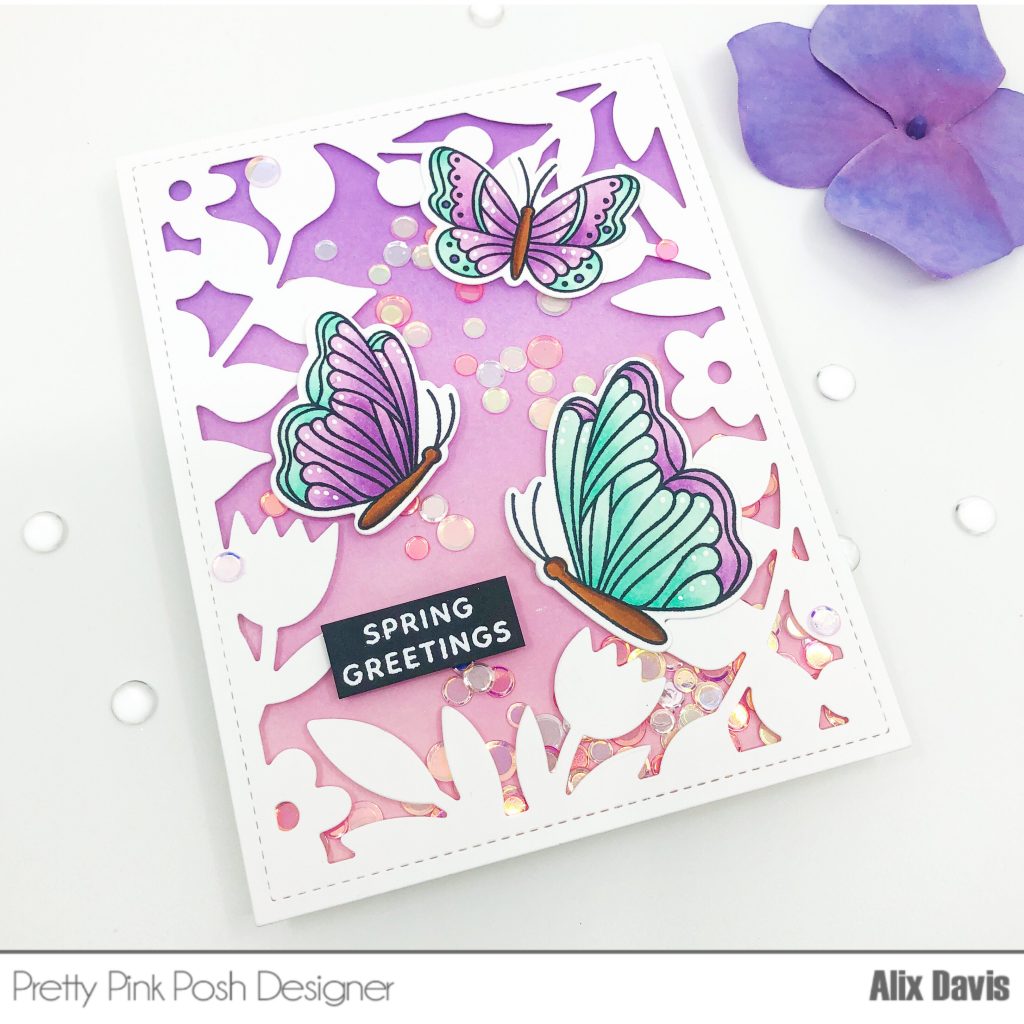
I adhered butterflies onto the front panel using Multi Medium Matte and Foam squares. Since I don’t want to over distract my whole layout. I decided to go for a smaller sentiment. I stamped “Spring Greetings” sentiment from Spring Wreath Stamp set over a piece of black cardstock paper with versamark and heat embossed with white embossing powder. Then I free hand cut it into a rectangle shape and adhered onto the lower corner. I added a few more Friendship confetti Mix here and there to finish this card.


<Card 2>

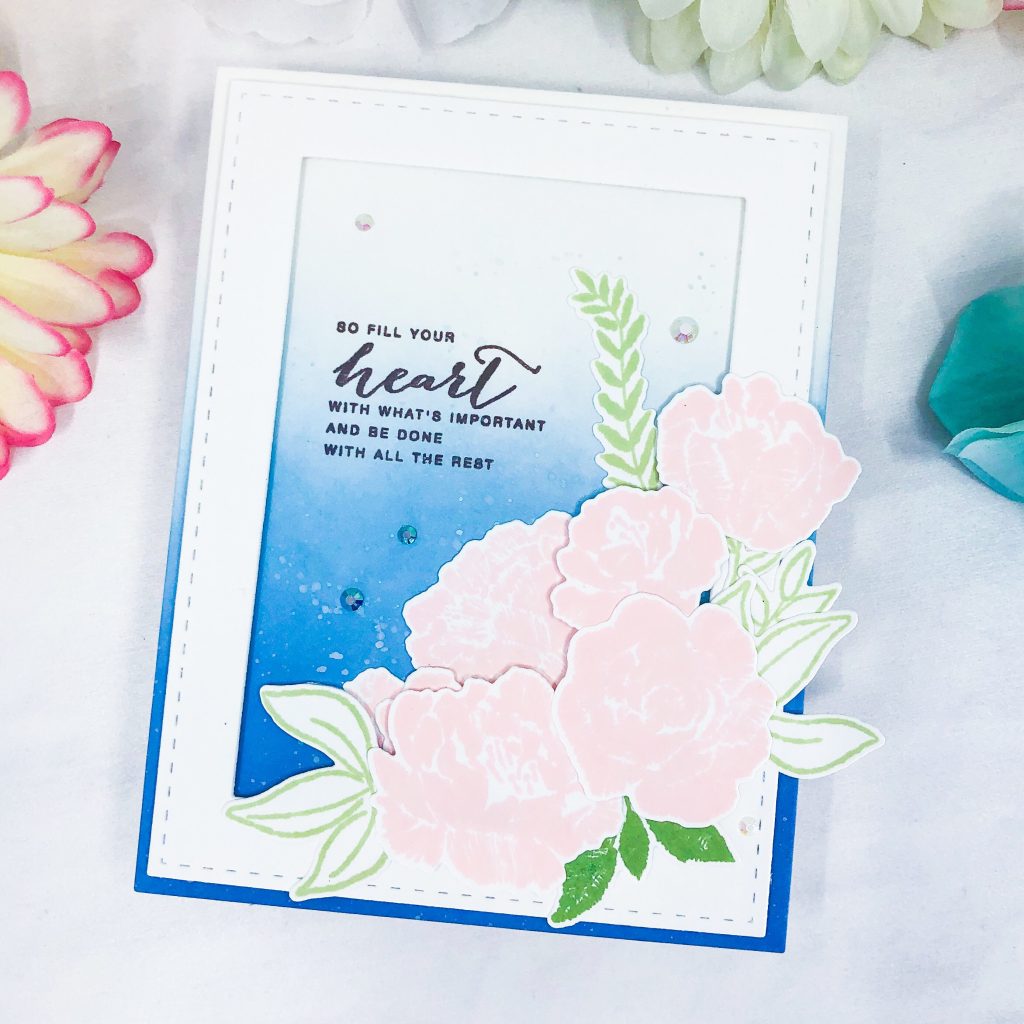
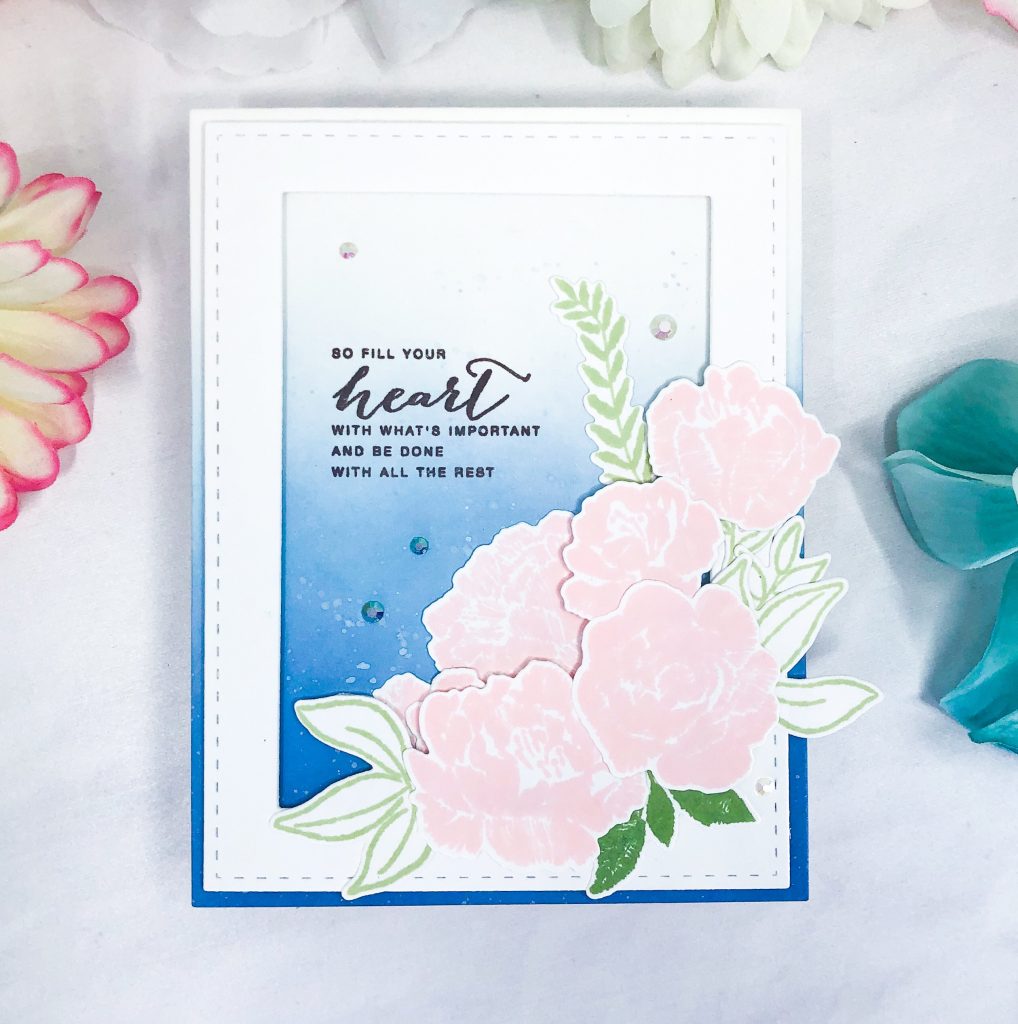
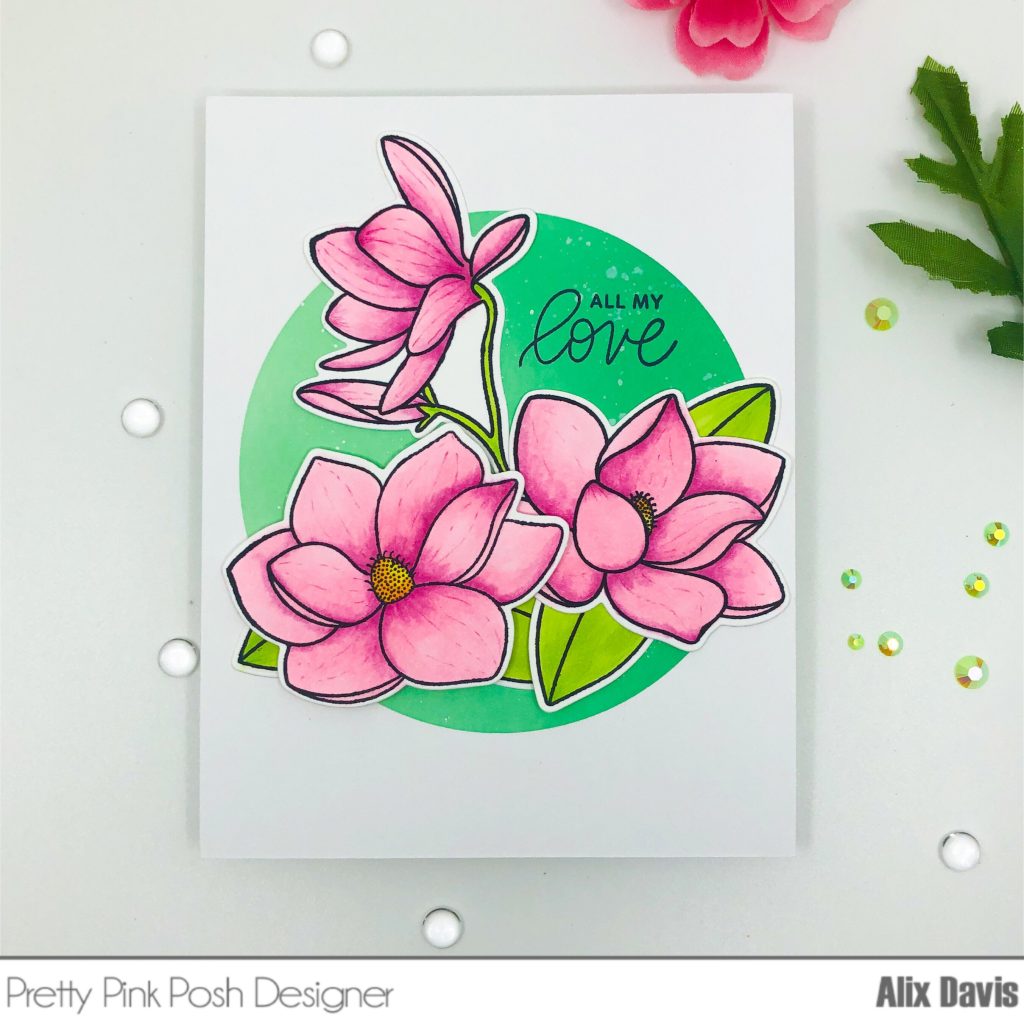
For my second card, I would like to go with some flowers. I stamped images from Magnolia Flowers Stamp set and cut with Coordinating Dies. Then I copic colored them with RV10, rv55, YG03 and detailed with couple Prismacolor pencils.

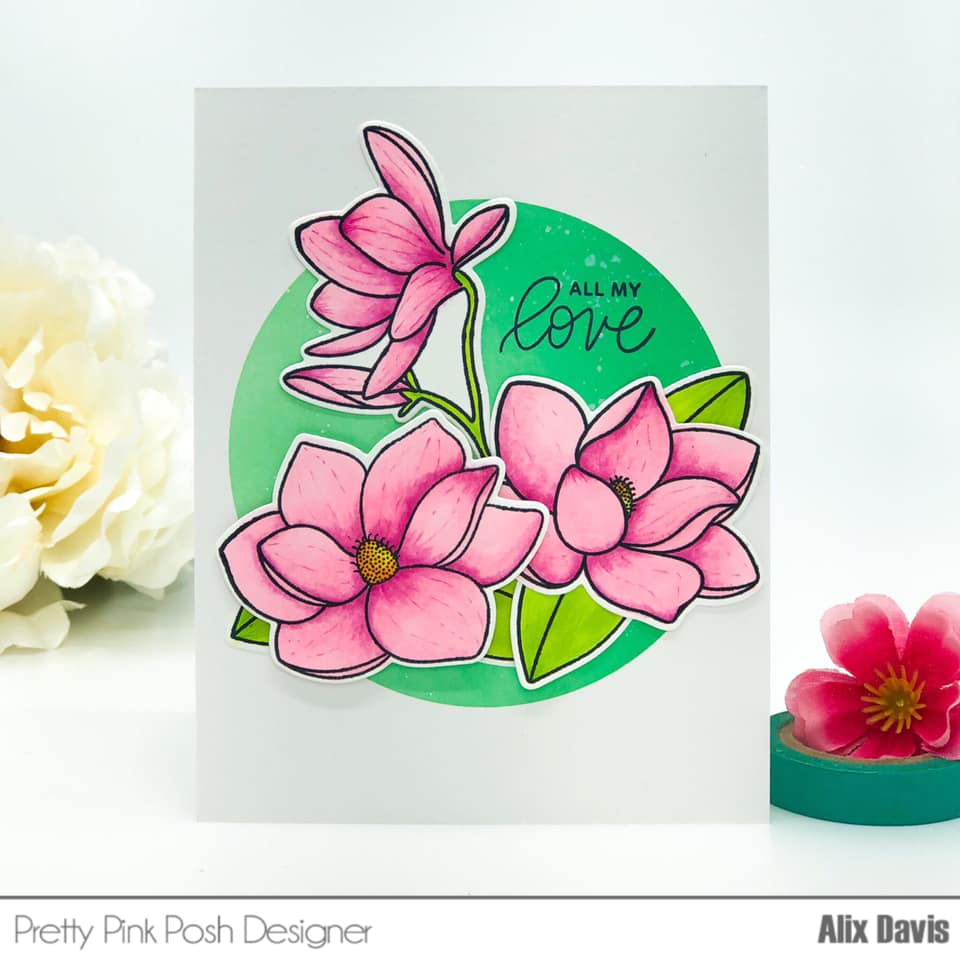
I decided to make a card with less dimension this time. I cut a desired circle out of a piece of masking tape and masked my white panel using the negative part out of the masking paper. I then ink blended with Tim Holtz Distress Oxide ink in Cracked Pistachio and Lucky Clover and splattered a little bit white paint over it to create some textures.

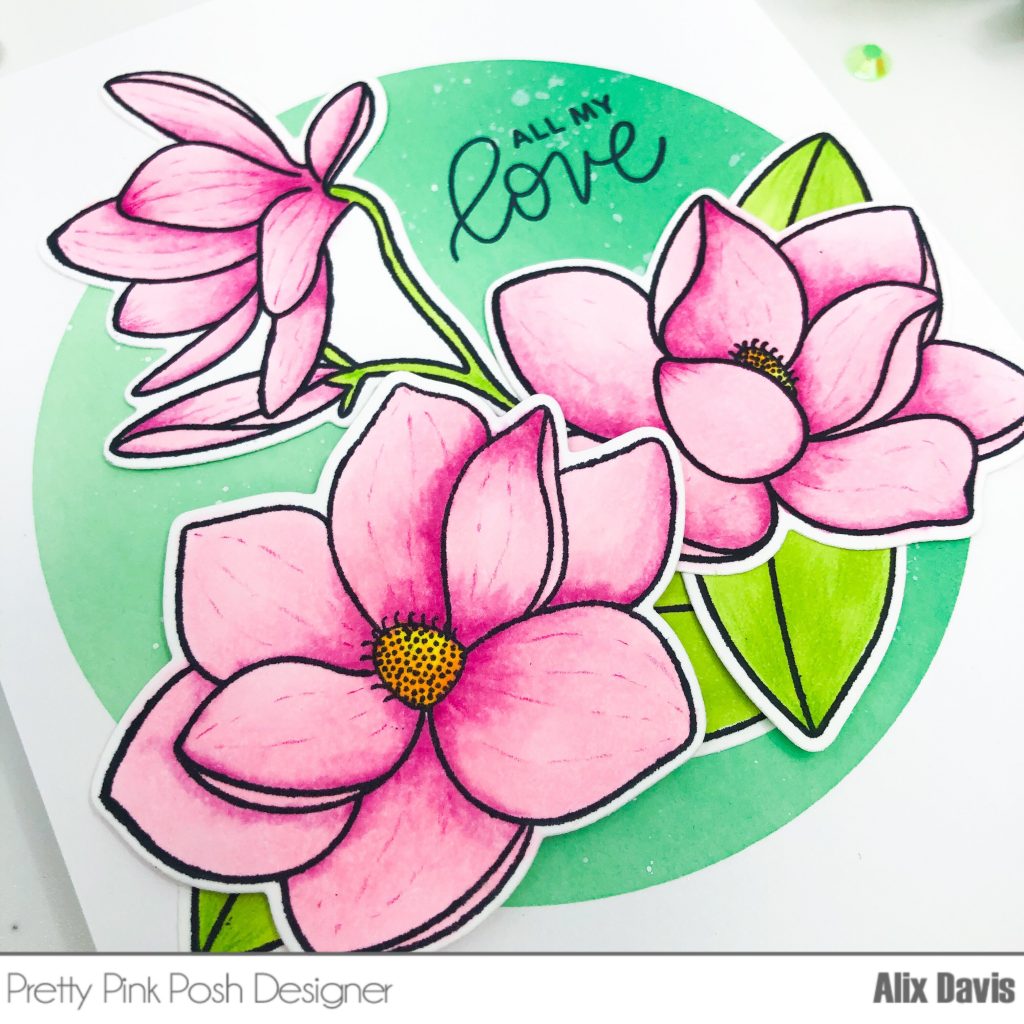
I adhered the colored images to the background with Multi Medium Matte and Foam Squares.

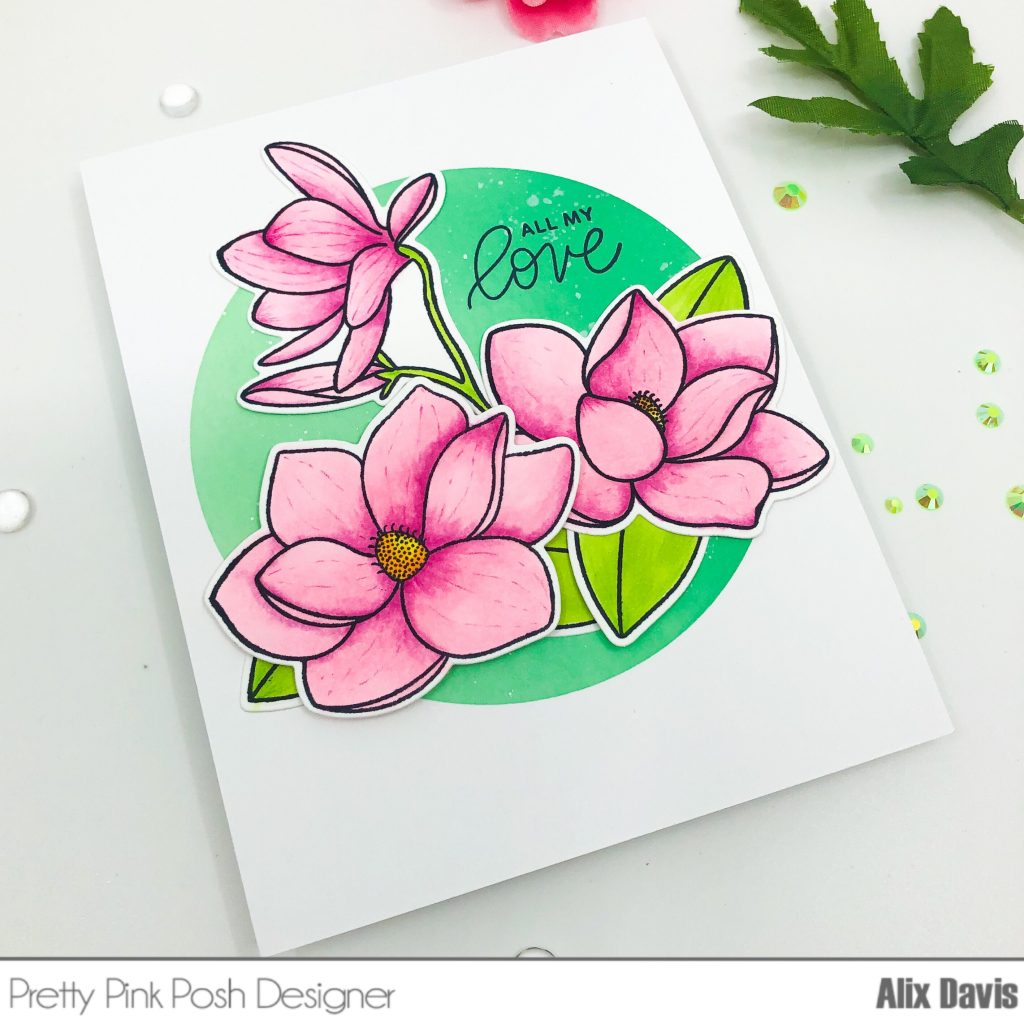
At last,  I stamped the sentiment “All My Love” from Love Sentiment Stamp set using Memento Tuxedo black ink. To keep my card simple and clean, I skipped using any embellishments. If you followed me for a while, you knew how hard I tried not to using any sequins or sparkles.

<Card 3>

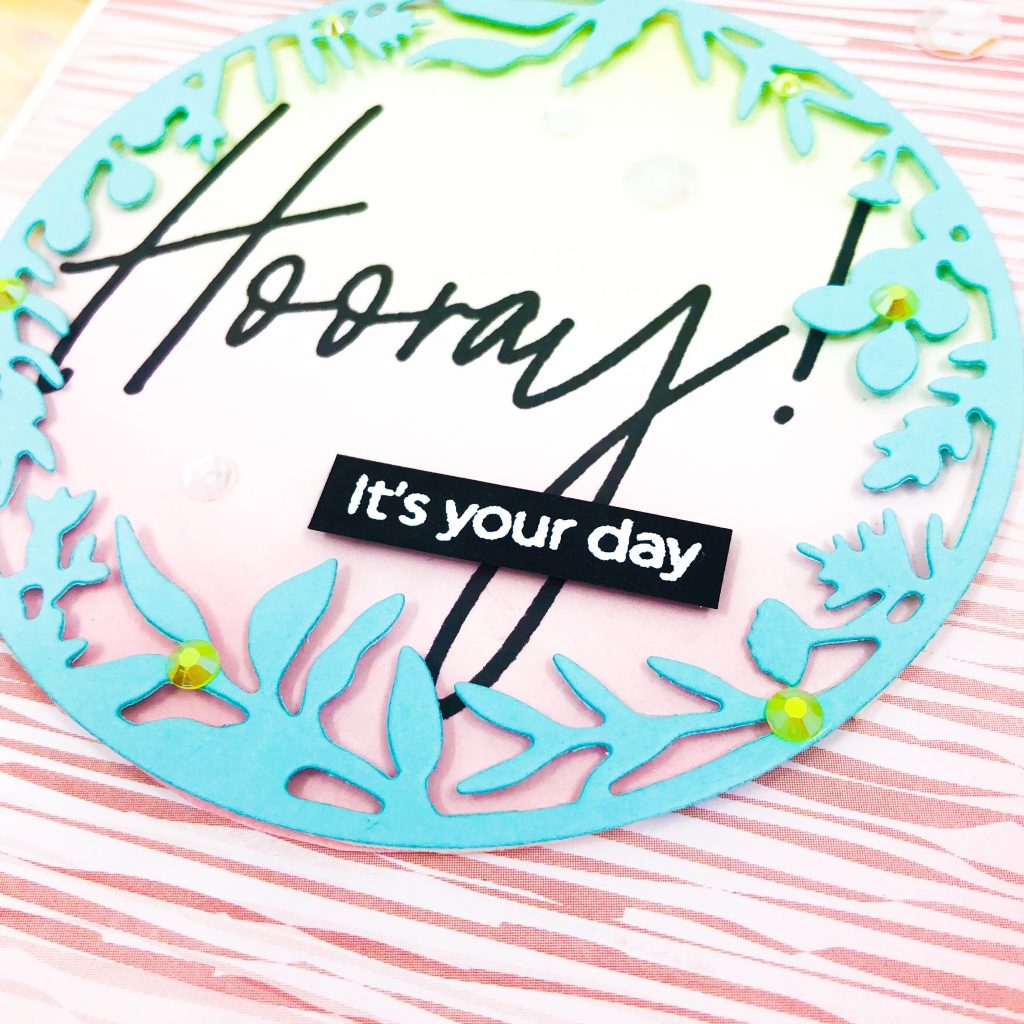
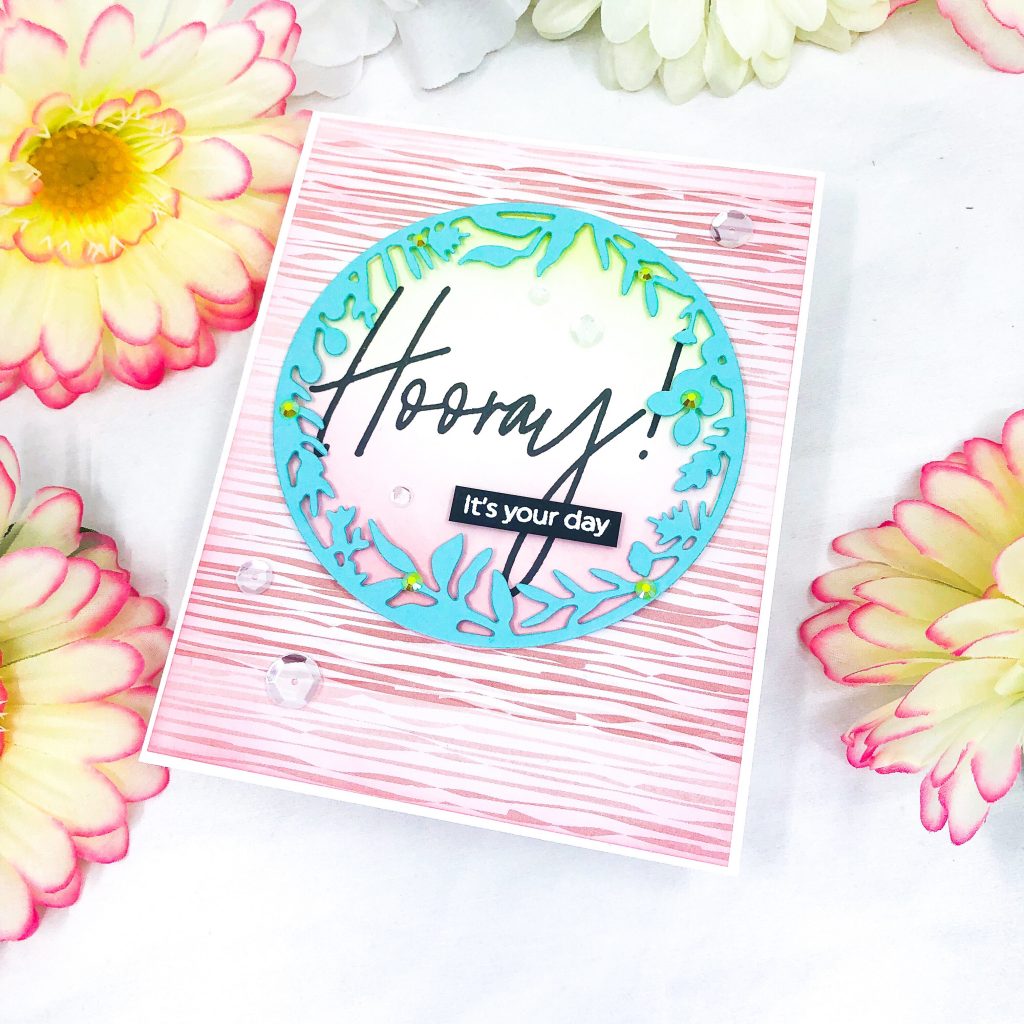
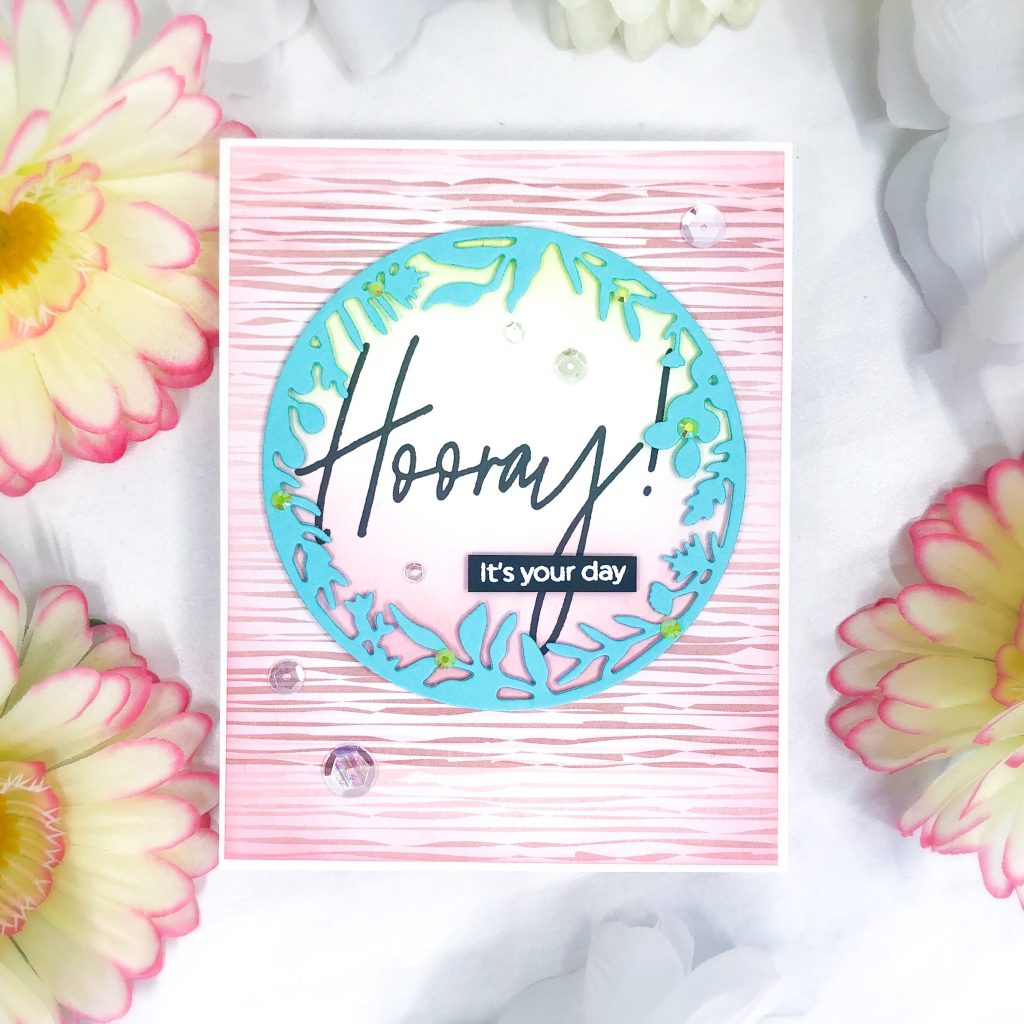
I was so happy to see another wreath stamp coming out since I didn’t have enough of Autumn wreath stamp set. What’s good about it is Paulina, the owner of Pretty Pink Posh, really tried building this stamp set that could match some of our previous stamp images and patterns to satisfy a person like me who enjoys mixing and matching with everything I owned.

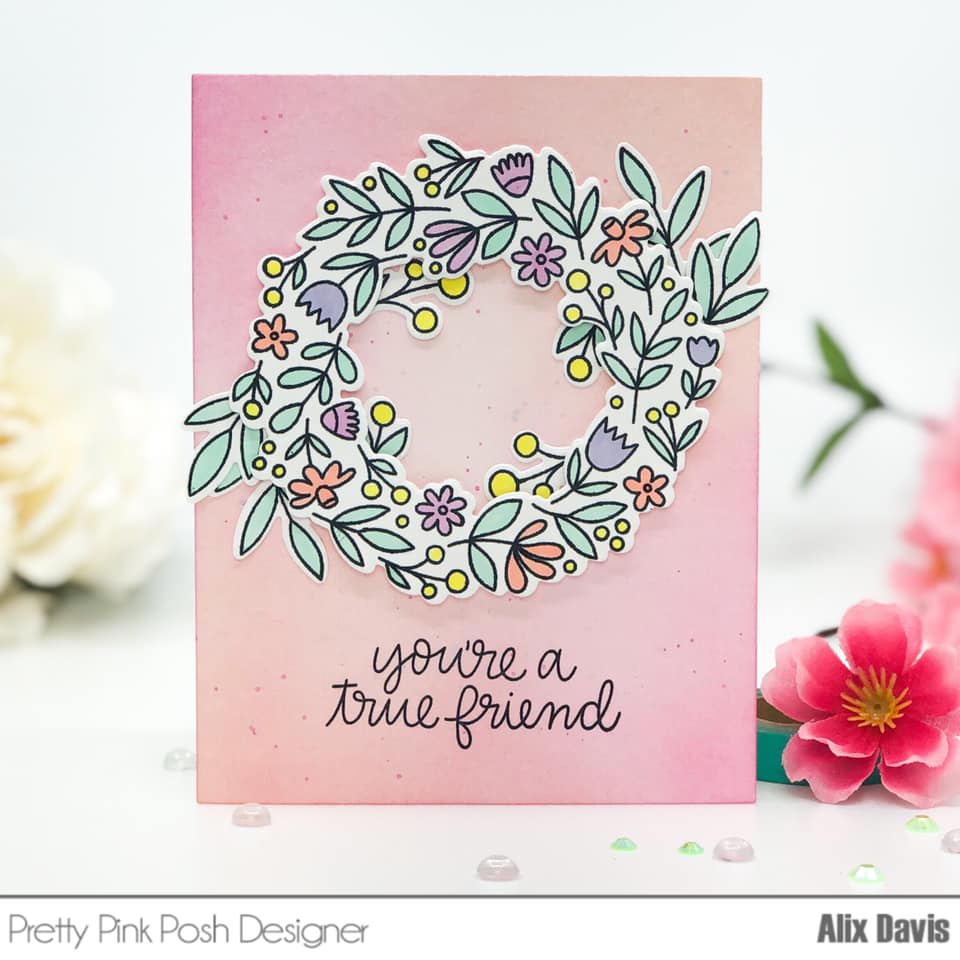
To begin with, I ink blended my background using Tim Holtz Distress oxide ink in Worn Lipstick and Picked Raspberry over a piece of A2 sized watercolor paper. Then I splattered some ink over the background to create some interests.

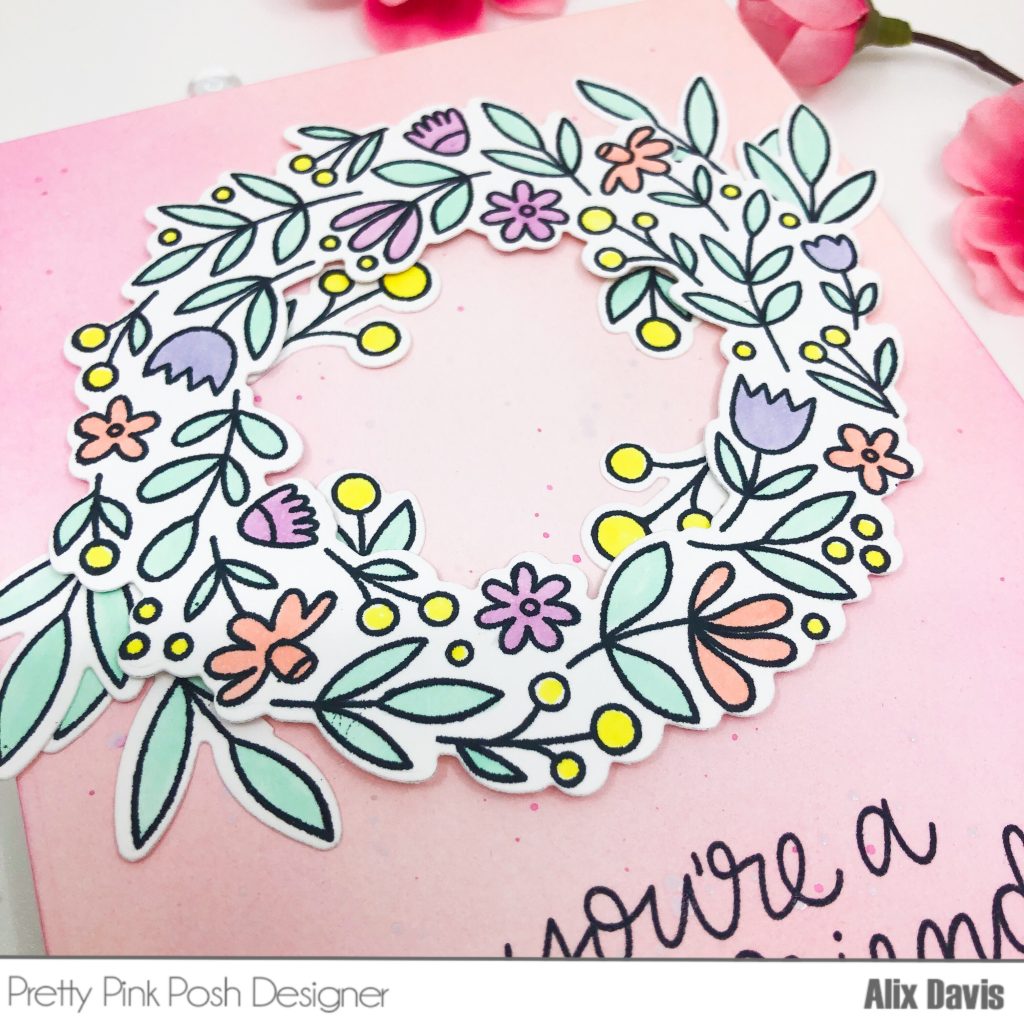
I stamped the wreath and other element images from Spring Wreath Stamp set with Memento Tuxedo black in over Neenah Solar white 80lbs cardstock paper and die cutting with Coordinating Dies. Then I colored them with copic makers (Y02,G00, BV00, R20, V01) to create more pastel look.

I arranged all selected images onto my prepped background using Foam Squares and Multi Medium Matte.

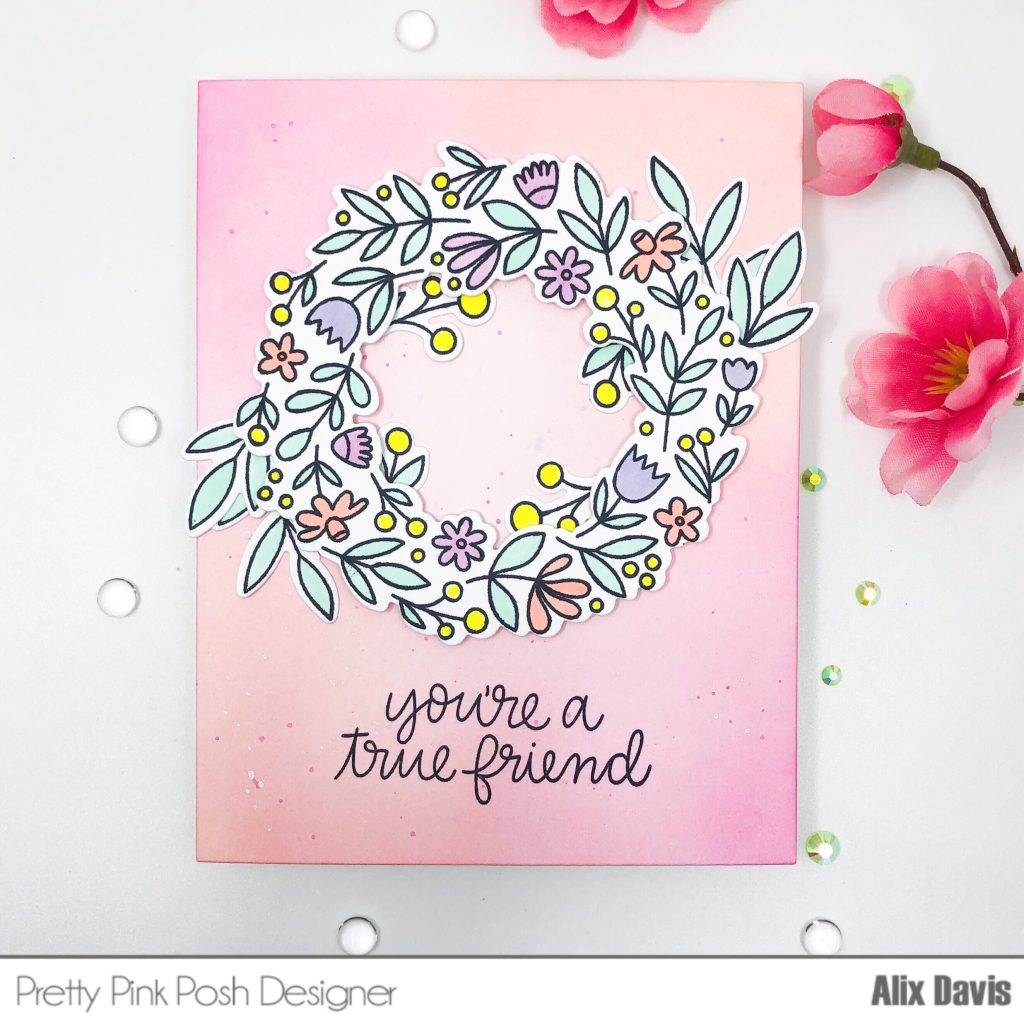
I finished this card by stamping the sentiment “you’re a true friend” from Peacock Friends Stamp set onto the lower portion of the panel.

<Card 4>

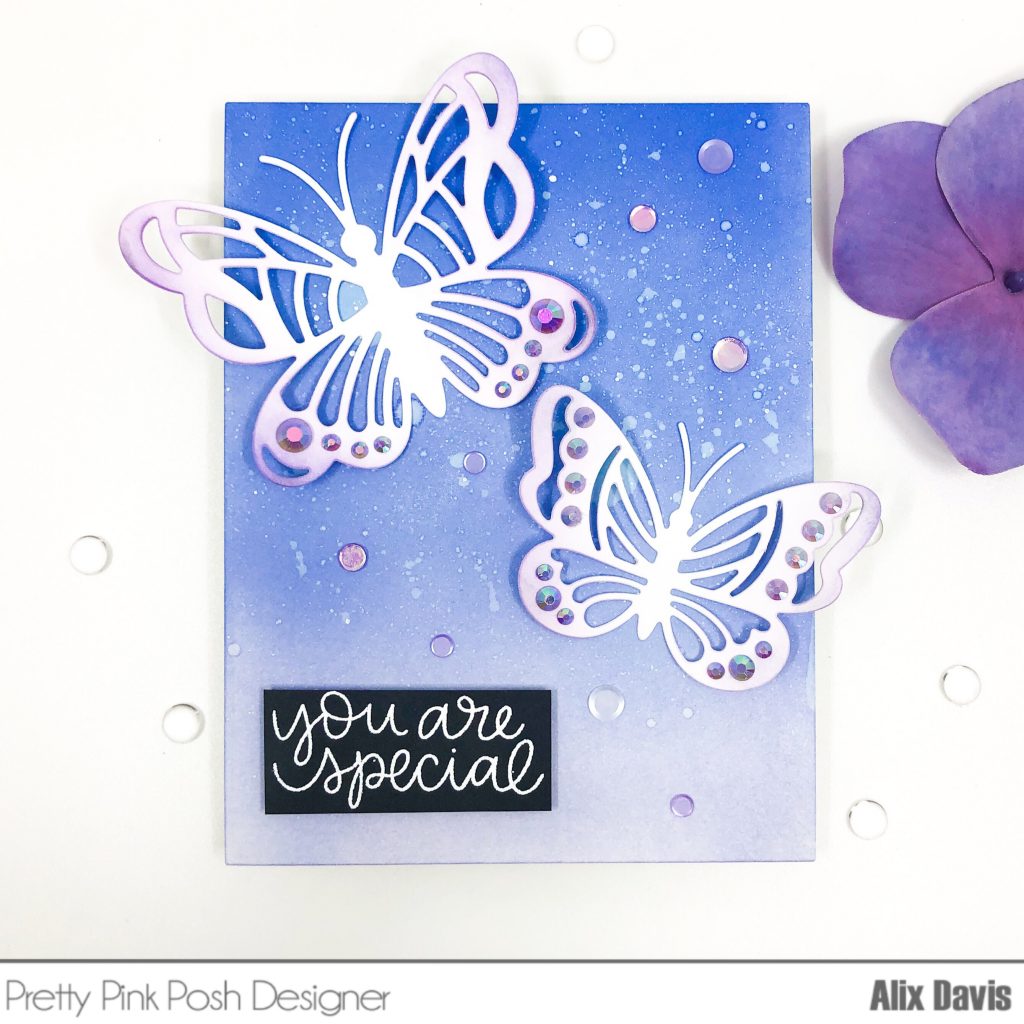
Now we are coming up to my last card. First of all, I ink blended my background with Tim Holtz Distress Oxide ink in Tumbled Glass, Shaded Lilac and Blueprint Sketch over a piece of  A2 sized watercolor paper. Then I splattered some water over the background and picked up some color by using paper towel.

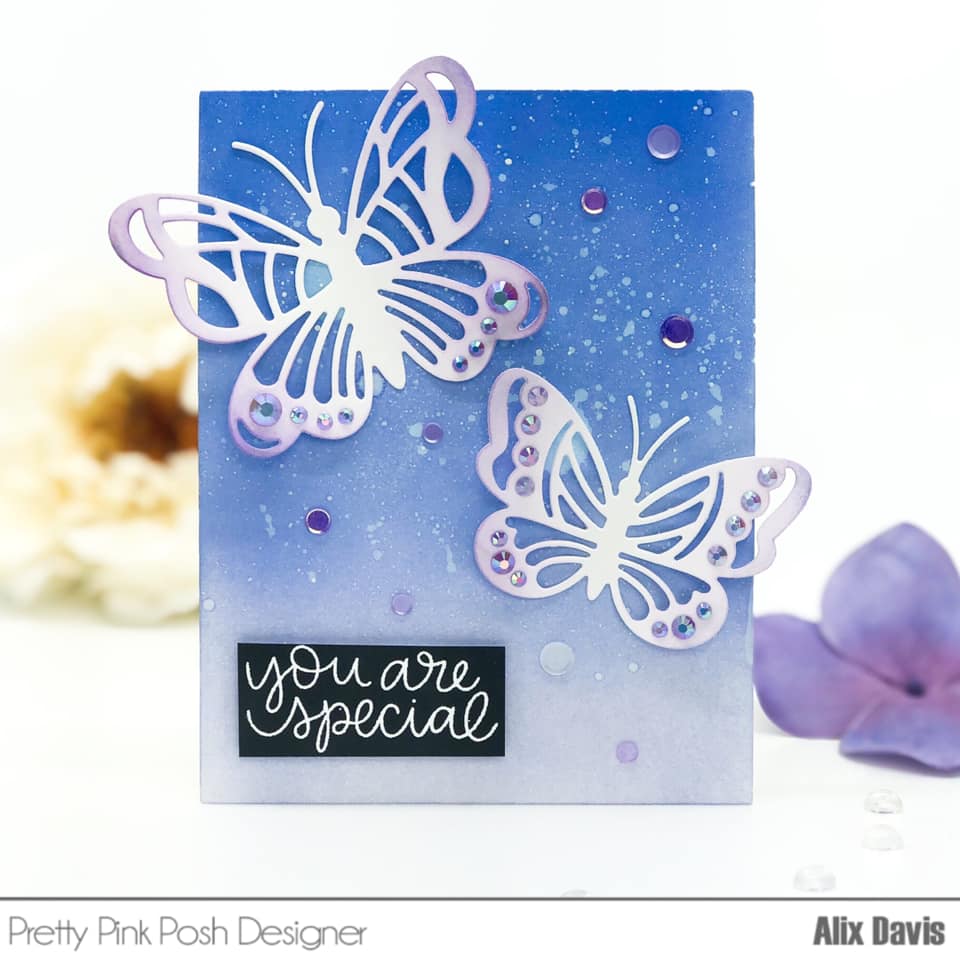
I die cut my butterflies using Bold Butterflies Die out of white cardstock. I lightly inked edge of the wings to create the dimensions. I also added Pansy Purple Jewels to embellish my butterflies.

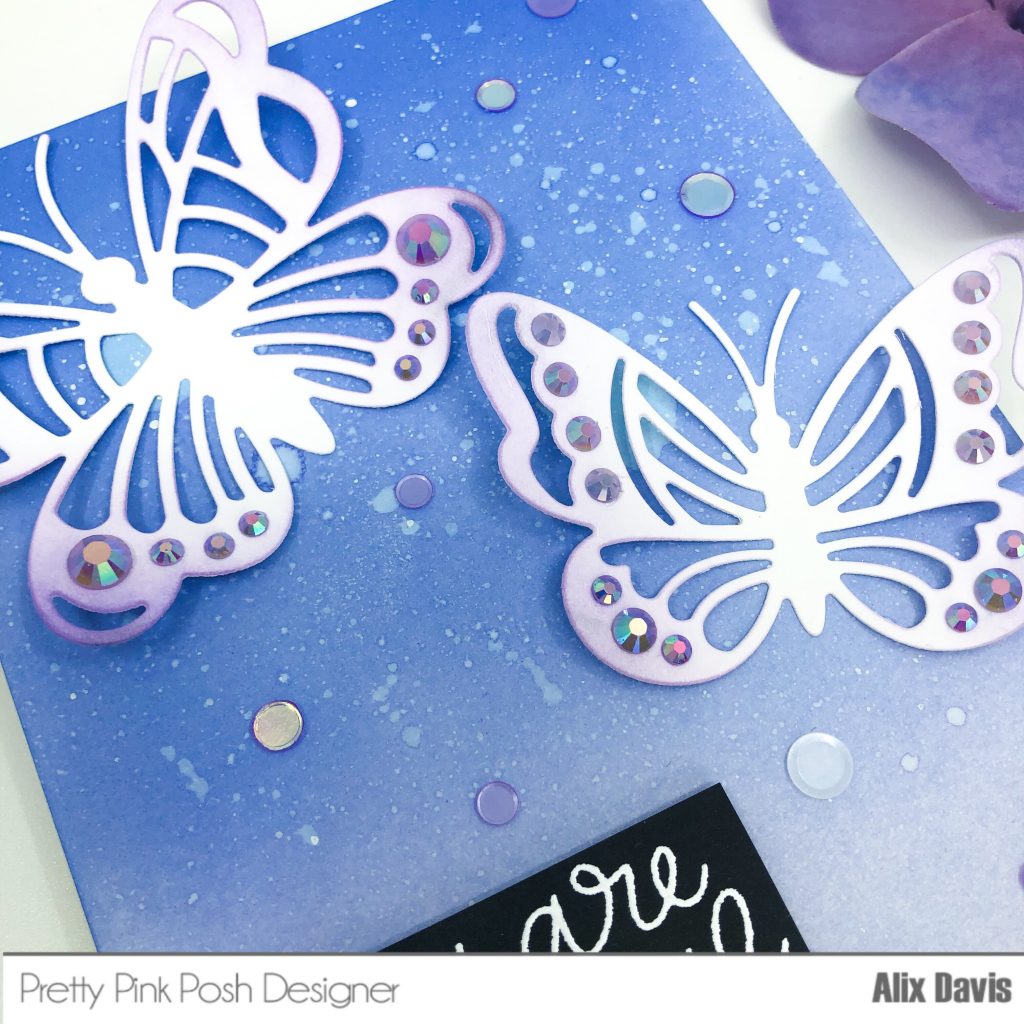
I attached decorated butterflies over the background using Multi Medium Matte and bend the wings so it looks like they are flapping their wings in the air. Then I scattered some Wisteria Blossoms Confetti to fill the space.

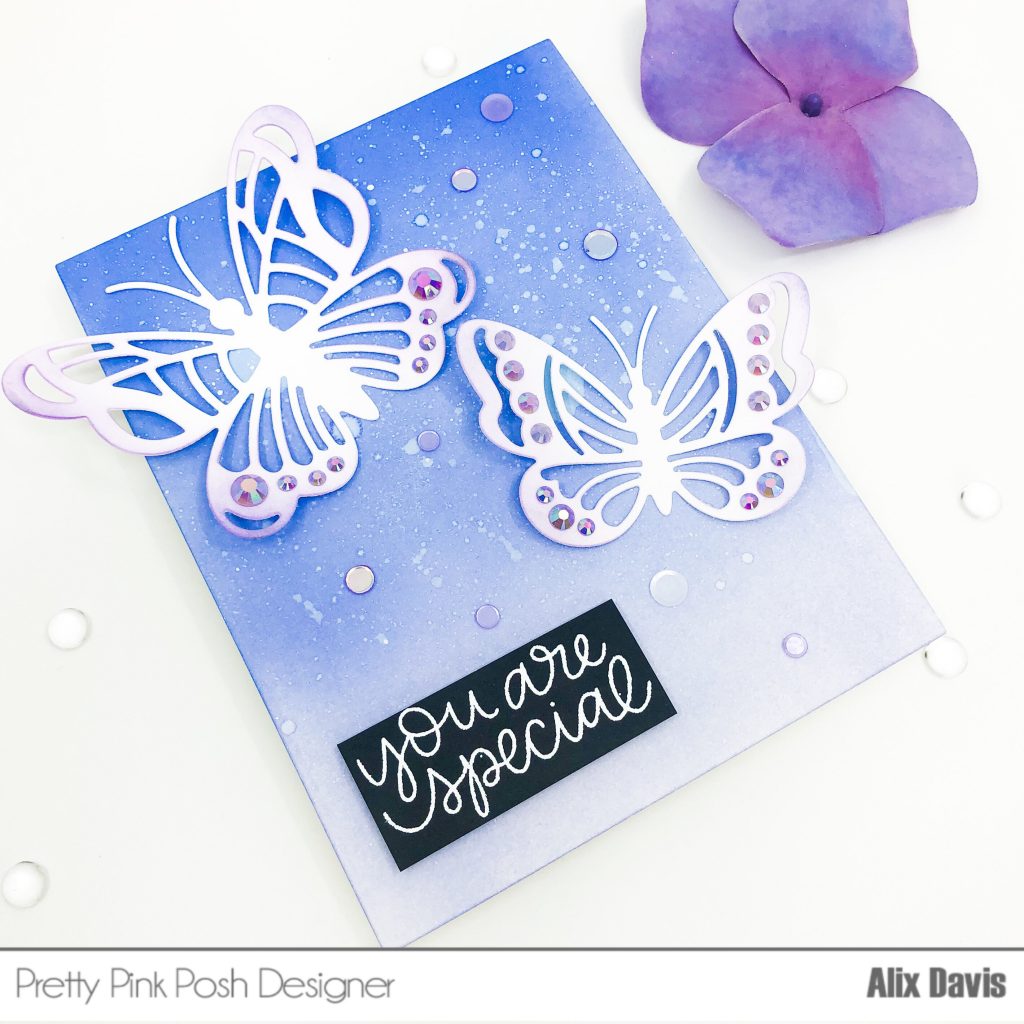
In the end, I stamped the sentiment “you are special” from Peacock Friends Stamp set with versamark ink over a piece of black cardstock paper and heat embossed with white embossing powder. Then I free hand cut it into a rectangle shape and adhered onto the lower left corner.

There are 4 $25 gift certificates up for grabs (two winners each day). Winners will be picked randomly along the blog hop. Comments must be left by 11:59 PM PST on 3/13/2019. Winners will be announced on the PPP blog. Hop with us now!

Waffle Flower 2019 March Blog Hop + Giveaway

We have the lovely Lilac Dreams set (stamp, die, combo) illustrated by Oana Befort this month which brings to mind summer breezes and sweet scented flowers. We also have a new Bouquet Builder set featuring a beautifully arranged bouquet of wildflowers illustrated by Karla Jodoin (stamp, die, combo). The pretty floral elements from our Loved stamp set is now back in a much bolder format in XOXO (stamp, die, combo). To compliment the adorable Be Her stamp set, we now have a dapper Be Him set (stamp, die, combo)! The Animal Tags set, designed by JJ Bolton, (stamp, die, combo) can be customized to create the cutest bear, panda or frog tags. This month we also have two stand alone dies. The Stitched Rose die allows you to add the look of beautiful stitching to a card in the shape of a pretty rose. The Wave Texture Die incorporates fluid stitched lines that are reminiscent of a rolling wave, falling rain, or gentle winds.

This month we have 5 new stamps and 7 dies. I made four cards to inspire you hopefully!

<Card 1>

The main image of this Bouquet Builder set is fairly large. All I need to do is to stamp it onto a piece of Neenah Solar white 80lbs cardstock paper with Memento Tuxedo Black in, then colored with Copic markers. After die cut it with it’s Coordinating Die, I had it set aside. I ink blended onto a piece of A2 sized watercolor paper using Tim Holtz Distress oxide ink in Shaded Lilac and Blueprint Sketch, then I splattered coordinating colored inks and white paints over the background to create some textures.

I free cut two sides of my background with paper cutter and adhered it onto the A2 card base to create color contrast. I stamped the sentiment “happy birthday” that comes with this stamp set onto a piece of black cardstock paper using Versamark and heat embossed with white embossing powder. I arranged the image and sentiment on the top of card and added some clear enamel dots from Waffle flower enamel dots in Stardust  to finish my first card.

<Card 2>

I believe some of you already had fun with Be Her stamp set from last month. Now it’s His turn! This Be Him stamp set is perfect for every card receiver. I was inspired by a watercolor painting on the internet for the layout. So I ink blended a piece of A2 sized watercolor paper with Tim Holtz Distress oxide ink in Twisted Citron and Cracked Pistachio, then splattered whole bunch of white paint using tooth brush flicking technique. I really don’t have a specific layout tamplet, so I just free hand cut all rectangles and squares with my paper cutter. I adhered them onto an A2 card base and set aside.

I stamped selected images from Be Him stamp set and cut with Coordinating Dies. Then I colored them with copic markers. Since this set doesn’t come with any sentiments, I grabbed the sentiment form Group Hug stamp set in January release and white embossed it onto black cardstock paper. After I stamped the large sentiment “Hugs” directly onto the background, I adhered the embossed sentiments around it. I arranged all images onto the card using and added enamel dots from  Up & Running and  Stardust

<Card 3>

We are moving onto my third card now. This color combo is highly inspired one of art work that I saw a while ago. The main colors are Dark blue, light blue, Red and black.  I really worked out of my comfort zone and played a little this time. I stamped all images from XOXO stamp set with dye inks and cut with Coordinating Dies.

Then I heavily utilized my white gel pen to create all details and textures on my die cut images. Suddenly, all my elements became more interesting. After adhered them onto an A2 cardbase using Multi Medium Matte and Foam tapes, I used black archival ink pen to create some dots around my images. At last, I simply stamped the sentiment “XOXO” using Versafine Oynx Black ink to end this card. It looks simple but it is not simple as well if you get into all details. Right?

<Card 4>

Lilac Dream Stamp set is something that really softens my heart when I saw it. Not sure why, I knew I wanted make it into something purple and I would like to send this card to my mom who lives in China. I started to mask my background using some washi tapes, not limited to any specific brand, as long as it is low tack tape. Then I ink blended uncovered area using Tim Holtz Distress oxide ink in Pickled Raspberry, Wilted Violet and Seedless Preserves. I splattered a little water over the background and dried it with a piece of paper towel. I removed the washi tapes and cut top and bottom of panel about 1/4 inches.

I stamped the image from Lilac Dream Stamp set and cut with Coordinating Dies. I colored the images with Copic  colors (Hair and shoes: E37,E29 Skin:E00, YR31 Cheek: R20 Shirt: R27 Skirt: B24,B26 Flowers:V12,V15,V17 Leaves:YG03,YG17) I adhered the image onto the background I created, and added all panel onto an A2 card base using foam tapes.

Now you have it. A quick peek of all cards I created to tease you from this wonderful collections. Be sure to be inspired by other creative designers!

         Waffle Flower          
       Jessica Frost-Ballas        

                 Emily Midgett                   

Hop Prize

To celebrate the blog hop, Waffle Flower is giving away $25 gift certificates to THREE lucky winners. You can leave comment on my blog and along the hop by 11:59pm ET on 3/7/19 for your chances to win. Winners will be chosen at random from the comments left on any of the posts on this blog hop and will be announced on the Waffle Flower blog on 3/11/19.


Best of Luck- Pretty Pink Posh 3 Days Sale

Hi Crafty Friends!

I am showing you this card featuring Pretty Pink Posh Best of Luck Stamp set and Coordinating Dies Sale. You could get 25% off on them from now till 2/25. St. Patrick’s Day is about 3 weeks away which means you still have time to catch up with making a card for your friend, family or any receivers!

I started to stamp and copic color all images form Best of Luck stamp set and cut with the coordinating dies. After I set them to aside, I prepped my background using ink blending technique with Tim Hotlz Distress ink oxide ink in Twisted Citron and Lucky clover over a piece of A2 sized watercolor paper.  I used two pieces of clover dies from the coordinating dies to cut over the background in order to create two small windows. To make shaker windows, I added acetate paper underneath the openings and poured some jewels in shamrock then closed them with foam tapes.

I cut the frame out of a piece of white card stock using Pretty Pink Posh Scallop Frame Die and attached it onto the background with Foam strips. I stamped the sentiment “Best of Luck”  and arranged the images to their best “destinations”.

Last but not least, I added jewels in shamrock to embellish my background and finished my card after attached it onto an A2 sized card base.

Don’t forget to get free shipping if you spend $60 or more! Have fun shopping!