Waffle Flower x Tombow Inspiration Week

Hello Everyone,

Waffle Flower Crafts teamed up with our friend Tombow to bring a whole week of Inspirations using products from both companies. For my today’s project, I included Waffle Flower Bouquet Builder 6 Stamp and dies, Waffle Flower Mini Media Mat, Waffle Flower Wave Texture Die, Oversized Hello Die,Tombow Dual Brush pens and Tombow TwinTone Dual-tip Markers.

To create my project, I picked one of floral image from Waffle Flower Bouquet Builder 6 Stamp set and stamped it onto a piece of Bristol Smooth paper with Tim Holtz Anitique Linen Distress ink. Then I picked out four main colors to color this image which are Tombow Dual Brush pens in #403,817,277 and 025.  I die cut this image with the matching dies.

During my coloring process, I colored my image by first directly coloring on small portion and then spreading the color with a thin paint brush. To even out my color transition, I scrabbled the color onto the Waffle Flower Mini Media Mat and then transferred onto the image.


Once I was done with coloring. I die cut my background using Waffle Flower Wave Texture Die out of a piece of white card stock paper. I also die cut the Large hello using Waffle Flower Oversized hello Die out of a piece of Gold shimmer card stock paper. I assembled colored image and word die cut onto my background.

At last, I chose a color that was close to my gold shimmer hello from Tombow TwinTone Dual-tip markers and added dots to bind my all elements together.

There will be a giveaway for you to enter on Instagram on Friday for 2 winners to each receive a prize package totaling $150! More details to come! To stay ahead of the game, follow us at @waffleflowercrafts and Tombow at @tombowusa NOW! Good Luck!!!

Instagram Giveaway
Goes Live on Friday, March 13 at 8:15am EDT and  closes on Monday, March 16th at 8:15am EDT.
Each winner will receive both prizes:
Tombow Prize:
– 1 x 5-Pack of ABT PRO Alcohol-Based Markers
– 1 x 10-Pack of Dual Brush Pens
Waffle Flower Prize:
– 1 x Mini Media Mat
– 1 x $50 Gift Certificate to waffleflower.com

Waffle Flower 2020 March Release Blog Hop

Welcome to Waffle Flower March 2020 Release Blog Hop! This is a lovely season. I have been working hard in my backyard such as pulling weeds (always no fun but headache) , planting vegetable seedlings. I am just so happy to see all trees are growing buds and new branches. Now I am here introducing a bunch of fun springing products to you and I know you would love them!

<Card 1>

For my first card, I decided to keep simple color tones for the baby scene. I chose pink and light teal blue for my color combo. I prepped my background by ink blending with Tim Holtz Distress oxide ink in Worn Lipstick, then I splattered the same color over the background. I stamped the images from Little One Baby Stamp Set in Memento ink in Rich Cocoa onto Neenah solar white 80lbs cardstock. I die cut them using Little One Baby Matching dies and colored with copic markers. I arranged them onto the background using liquid adhesive and foam tapes. I also added different sizes of sequins as embellishments to finish.

<Card 2>

Anyone grows tulips in the garden? I have a small area that contributes to these lovely flowers every spring. To me, they please you so much with you putting so little effort. If you haven’t try them, it’s not too late to try them. For this card, I cut a smaller sized rectangle by using  Stand-alone – Additional A2 Layers Die and layered it over an A2 sized card panel. Then I lightly ink blended it with Tim Holtz Distress oxide ink in Seedless Preserves. I stamped the image from Tulips Stamp set and die cut with the matching dies. I enjoyed coloring this fairly large image with copic markers. I splattered the same paint over the background and added sentiment “Grandmother you are loved”.

<Card 3>

Now let’s give our card some rainbow colors. To make this card, I die cut Oversized Hello Die out a piece of white card stock 5 times. First I glued 3 of them onto an A2 sized card panel. Then stacked the rest of 2 to create a thicker “hello” die cut. I splattered gold paint over the background, copic colored my focal point and adhered it to the center of my card. A little trick, pick 3 colors in the same color family and blend them together until to the ombre colors that you desired. You can make your own copic color wheel by using this Waffle Flower Amazing Products.

<Card 4>

Here comes my last card. To be honest, I was a little disappointed with the result of the photos, because it just did not show the textures I want to get you to see. To start with this card, I first heavily ink blended my background using Tim Holtz Distress oxide ink in  Peacock Feather and Lucky Clover. Then I layered a piece of rectangle shaped vellum paper to tone the color down a little. Then I die cut whole bunch of foliage pieces out of white card stock by using Sprigs Die. I adhered them on the the background and splattered gold paint over. To match the gold paint, I stamped my sentiment and gold embossed it onto vellum paper. At last, I added my all time favorite embellishment-Enamel Dots in Stardust to finished my card.

HOP WITH US!!!

Waffle Flower         

Alix                         

Keeway                  

Jessica                   

Natalia                    

Elyse                      

Mindy                     

Galina                    

Channin                 

JJ                           

Rebecca                

Promotions:

To celebrate the blog hop, Waffle Flower is giving away $25 gift certificates to THREE lucky winners. You can leave a comment on this blog and along the hop by 11:59pm ET on 3/7/20 for your chances to win. Winners will be chosen at random from the comments left on any of the posts in this blog hop and will be announced on the Waffle Flower blog on 3/9/2020.

Receive a FREE Mystery Gift with all orders $50 and over, while supplies last.

No code required; Limit 1 per customer; While supplies last; Valid through midnight 3/7/20

Waffle Flower 2020 February Release Blog Hop

Welcome to Waffle Flower February 2020 Release Blog Hop! It’s been a little cold outside. I hope everyone stays warm and be healthy from any yucky bugs! Here you will see a sweet and cozy collections to warm your heart!

<Card 1>

For my first card, I wanted to create a shaker card. I ink blended lightly on my background using Tim Holtz Distress oxide ink in worn lipstick and picked raspberry, then I stamped and white embossed the sentiment “Love you my friend” from Jars of Sentiments Stamp set. I cut the white frame by overlapping couple of dies from A2 Layered Die. I attached a piece of acetate paper underneath my white frame, poured my shaker elements and closed it up with foam tapes.

I cut 3 different sized of bows by using Easy 3 D Bows Die which is a re-release of our 3D bow dies out of plaid pattern paper, then I assembled them easily with a little bit glue. I attached them onto my shaker window to finish my first project

<Card 2>

Raise your hand if you love kitty cats! I was so happy to see Big bear and bird’s illustrations becoming craft cutting dies for us to play with. I created my background by ink blending Tim Holtz Distress oxide ink in tattered rose and Worn Lipstick. Then I stamped the sentiment “Wishing you the Happiest of Days” in black and white embossed flower stamps from Jars of Sentiment Stamp set.

I die cut the kitty cat by using Be a Cat Die and colored it with copic markers. I also made the color matching bow using Easy 3 D Bows Die . At last, I attached my cutest kitty onto the background.

<Card 3>

Lily is one of my favorite flowers! Waffle Flower has this fairly large die which could take over the whole A2 panel with no stress. To make this card, I simply stamped the image from Potted Lily Stamp set and cut with the Matching Die. Then I colored it with copic markers. I added patterns onto the blue pot using white gel pen and I also splattered white paint over the flowers to create textures.

I created my background by ink blended the background using Tumbled Glass Distress oxide ink and splattered the matching ink and water mixer over. Once it was dry, I stamped the sentiment “Happy Easter” from the same stamp set and attached colored images.

<Card 4>

Spring is coming soon, I just cannot wait to start my backyard garden and see all birdies and butterflies stopping by. This is a simple card but bring you not so simple vibe. I guess I somehow was into pattern paper lately so I decided to have green plaid pattern paper as my base. Then I cute  a piece of rectangle white card stock that was about half inch smaller than my base. I rounded all four corner using my corner chopper and stamped my sentiment which was from Jars of Sentiments Stamp set.  I did splattered some blue ink over the background for a fun look.

I stamped the selected images from Jars of Happiness Stamp set and cut with the Matching dies. I colored them with copic markers and arranged onto my background to end my last card.

NOW HOP WITH US!!!

         Waffle Flower         

                   Mindy                    

Keeway

                    Natalia                    

                     Galina                     

Elyse

Alix

Channin

JJ

                Rebecca                

Promotions:

To celebrate the blog hop, Waffle Flower is giving away $25 gift certificates to THREE lucky winners. You can leave a comment on this blog and along the hop by 11:59pm ET on 2/7/20 for your chances to win. Winners will be chosen at random from the comments left on any of the posts in this blog hop and will be announced on the Waffle Flower blog on 2/9/2020.

Receive a FREE Mystery Gift with all orders $50 and over, while supplies last.No code required; Limit 1 per customer; While supplies last; Valid through midnight 2/7/20

Waffle Flower 2020 January Release Blog Hop

Welcome to Waffle Flower January 2020 Release Blog Hop! I hope you all had  wonderful holidays!!! For the first month of 2020, we are bringing you a set of creative products!

<Card 1>

For my first card,  I wanted to create a set of rainbow colors. I smudged Tim Holtz Distress oxide ink pads in different colors over 8 paper strips and set aside for later use. Then I cut my front panel using Sweet Scallops Panel Die out of a piece of white card stock paper. I arranged my rainbow strips over a piece of A2 sized card base and attached front panel using foam tape to create dimensions.

I stamped the sentiment “it will get better”from Fresh Rainbow Sentiments Stamp Set using memento tuxedo black ink onto the center of my panel and embellished the center with  Up&Running Enamel dots and sparkling clear sequins. At last, I attached tons of clear seed beads to create some interests in between lines.

   <Card 2>

I just cannot have enough of creative dies in this release. I ink blended an A2 sized watercolor paper using Tim Holtz Distress oxide ink in Mustard Seed, Twisted Citron, Cracked Pistachio, Tumbled Glass and Worn lipstick. Then I die cut them using Hearts Panel Die.  I save all negative cut outs in heart shape to be the embellishments for another card later. I poured seed beads in all kinds of colors, added acetate paper underneath of front panel and sealed them with foam tapes.

After I was done with my shaker card background, I die cut “Thank you” word using Oversized Love Word Die for 3 times out of white card stock paper. I glued them together to create thicker dimension. I easily attached this oversized word over the background to finish this card.

  <Card 3>

I really enjoyed the process of making this card. I first ink blended the background using Tim Holtz Distress oxide ink in Mustard Seed, Spiced Marmalade and Cracked Pistachio over an A2 watercolor paper. Then I die cut my front panel using Fresh Rainbow Panel Die out of white card stock paper and attached to the background using foam tape.

I stamped the sentiment “positive vibes coming your way” with Memento Tuxedo black ink onto the center of the panel, and decorate the rainbow shapes using  Up&Running Enamel dots

<Card 4>

Here comes my last card. I first made the pastel watercolor background using Tim Holtz Distress oxide inks, then I attached a thin strips in gold color to top and bottom of this background. Once the background was dry, I stamped “love you” in black using Oversized Love Stamp Set. Then I die cut the matching “love you” cut out from Oversized Love Word Die and ink blended it to ombre colors that matches the watercolor background. I adhered this cut out over the stamp on the background and purposely off set it a little to create faux dimension. I grabbed the heart die cuts from making my second card and embellished the background by attaching them with foam tapes.

 Now Hop With Us!

Waffle Flower          

Keeway Tsao          

Kelly Latevola         

Galina Filippenko    

Mindy Eggen          

Natalia Zubkova      

Elyse Robinson       

Amy Rysavy           

JJ Bolton                 

Alix Davis                

Channin Pelletier    

Rebecca Keppel     

Promotions:

To celebrate the blog hop, Waffle Flower is giving away $25 gift certificates to THREE lucky winners. You can leave a comment on this blog and along the hop by 11:59pm ET on 1/7/2020 for your chances to win. Winners will be chosen at random from the comments left on any of the posts in this blog hop and will be announced on the Waffle Flower blog on 1/9/2020.

Receive a FREE Mystery Gift with all orders $50 and over, while supplies last.(No code required; Limit 1 per customer; While supplies last; Valid through midnight 1/7/20)

You can also shop in bundle to save 10%


Christmas spirits – Pretty Pink Posh

Hello Everyone!

There are 17 days left till Christmas. Are you ready for it? Did you decorate your tree? Did you hang up the lights? Did you make your holiday cards? If not yet, I am going to bring you some Christmas Spirits with two of my cards!

<Card 1>

To make this card, I cut the window opening using Pretty Pink Posh Decorative Tag  2 die over a piece of A2 sized watercolor paper. Then I layered Wide Stripes Stencil over the panel and blended Tim Holtz distress oxide ink in candied apple. Once it’s done, I also ink blended the card base lightly used Worn lipstick distress oxide ink.

I cut the Christmas tree using Pretty Pink Posh Tree Shaker Die and inked with Cracked Pistachio distress oxide ink and decorated with Jewels in Raspberry color. Then I stamped and copic colored my selected images from Animal Signs stamp set and cut with the Coordinating dies and some stash from other Pretty Pink Posh stamp sets. After attached them on to my prepped background, I added Sparkling Clear sequins to finish this card.

<Card 2>

After using red color for my last card, I decided to shift my gear to another traditional color: Green. I heavily ink blended Lucky Clover and a little bit Peacock Feather Distress oxide inks onto a piece of A2 sized watercolor card. Then sprayed some water to take some intensify color off the background.

Coloring is always the fun part of card making for me. I stamped all ornament images from Decorative Ornaments Stamp set and cut with the Coordinating dies. Then I colored them with copic markers. I adhered them onto my background using Foam tape to create dimensions. At last, I stamped sentiment “Season’s greetings” and added Raspberry jewels.

Technically you still have more than two weeks to make your cards. Hope you will be productive during this week! See you soon!

This entry was posted in Cards.

Waffle Flower 2019 December Release Blog Hop

Welcome to Waffle Flower December 2019 Release Blog Hop! Hope everyone is doing great with holiday shopping. No matter you are done with your Christmas cards or not, we have your next holiday waiting for you this month!

<Card 1>

For my first card,  I used Harpy Birthday Stamp set illustrated by Big bear and bird. This stamp set is perfect for everyone especially musical lovers. I stamped the images from Harpy Birthday Stamp set and cut with the Matching dies. Then I copic colored the selected images.

I ink blended onto a piece of A2 sized watercolor paper with Tim Holtz Distress oxide ink in Worn lipstick and splattered coordinating ink over. I adhered colored images with liquid adhesive and Foam tapes and stamped the sentiment “You make my harp skip a beat”.  I added enamel dots from Up&Running Enamel dots set to finish my card

<Card 2>

The second card is all about Valentine’s day. I used pink and blue color combo to achieve a dreamy scene. I colored the images from Sending Love Stamp set and cut with the Matching dies.

I ink blended my A2 sized watercolor paper with Tumbled Glass distress oxide ink. Then I cut another piece of rectangle out of watercolor paper and ink blended with Worn Lipstick distress oxide ink. I adhered the smaller rectangle panel over the A2 panel. I adhered colored images and added sentiment “Happy Valentine’s Day”. At last, I embellished my card with some heart shaped confetti.

<Card 3>

Have you ever had admire or being an admire? I found this new stamp set is fun for you! I colored the images from Secret Admire Stamp set and cut with the Matching dies.

To create my background, I cut the center of A2 sized panel using die from Nesting Heart Dies. I added Worn lipstick distress oxide ink with gold splatters  onto the white part of the panel and ink blended center piece with Cracked Pistachio distress oxide ink. After adding clear enamel dots from Clean and Clear Enamel dots, my card was finished.

<Card 4>

My last card is all about floral. It is just fantastic to see waffle flower release floral images one and other. Introducing the 6th set in our popular Bouquet Builder series.

To begin with, I lightly ink blended my A2 sized background with Tim Holtz Distress oxide ink in Cracked Pistachio. Then I stamped and copic colored the images from Bouquet Builder 6 Stamp set and Die cut with the Matching dies. I adhered them onto my background with liquid adhesive. I white embossed the sentiment over a piece of black cardstock paper and hand cut it into rectangular shape. After attached my sentiment piece, I added enamel dots from Clean and Clear Enamel dots.

Hop With Us!

Waffle Flower

Galina Filippenko

Mindy Eggen

Natalia Zubkova

Elyse Robinson

Amy Rysavy

JJ Bolton

Alix Davis

Channin Pelletier

Keeway Tsao

Rebecca Keppel

Jessica Frost-Ballas

  • Promotions:

To celebrate the blog hop, Waffle Flower is giving away $25 gift certificates to THREE lucky winners. You can leave a comment on this blog and along the hop by 11:59pm ET on 12/7/19 for your chances to win. Winners will be chosen at random from the comments left on any of the posts in this blog hop and will be announced on the Waffle Flower blog on 12/9/2019.

Receive a FREE Stardust Enamel Dots with all orders $50 and over, while supplies last. No code required; Limit 1 per customer; While supplies last; Valid through midnight 12/7/19

Holiday Cards – Pretty Pink Posh

Happy Wednesday!

I would like to show you couple Christmas cards I made during last weekend. Thanksgiving is approaching. Are you ready for it?!

For my first card, I cut my frame using Decorative Tag 2 Die out of a piece of A2 sized watercolor paper. I ink blended my background using Tim Holtz Distress oxide ink ink Cracked Pistachio and Worn lipstick. I attached them onto my A2 card base using liquid adhesive and foam tape.

I stamped bear images using Pretty Pink Posh Bear Friends Stamp set and die cut with the Coordinating dies, Ornament images using Decorative Ornament Stamp set and cut with the Coordinating dies, Christmas hats using Penguin Pals Stamp set and cut with the Coordinating dies. Then I colored them with copic markers.

I arranged all colored images onto the background, added the sentiment and embellished the card with Pretty Pink Posh Jewels in Shamrock.

For my second  card, I inked the background with Tim Holtz Distress oxide ink in Worn Lipstick. Then I colored iamges from Pretty Pink Posh Elegant Holly Stamp set and cut with the Coordinating dies, Animal Signs Stamp set and cut with the Coordinating dies

I colored all selected images with copic markers and attached them onto my background using liquid adhesive and foam tapes. Then I stamped the sentiment “Season’s Greetings” and embellished my card with Sparkling clear sequins.

I hope you will have a great holiday week!

25 Days for Christmas Tags Blog Hop-Pretty Pink Posh

Welcome to 25 Days of Christmas Tags 2019 hosted by Tracy McNeely.  I am very happy to join this annual event with Pretty Pink Posh.

What I am showing is couple simple Christmas tags that you could easily duplicate and mass produce. To start with, I die cut two basic tag out of a piece of watercolor paper using Pretty Pink Posh Scallop Square Tags Die. Then I ink blended the background using Tim Holtz Distress oxide ink in Candied Apple. I splattered some gold watercolor paint over to create some interests. Once it’s dry, I punched the small holes on the top of the tags and added red and white patterned baker’s twines.

The other side, I stamped the holly and berries images from Elegant Holly Stamp set and cut with Coordinating Dies, Santa and Reindeer images from Holiday Signs Stamp set and cut with Coordinating Dies. I colored them with copic markers and attached them onto the tags with liquid adhesive and foam tapes. At last, I added Sparkling Clear Sequins Mix to embellish my tags.

Be sure to check out Tracey’s blog to read more about the 25 Days of Christmas Tags event and how you can win all sorts of fantastic sponsored prizes by companies shown below and be inspired!

MFT&Friends November 2019 Release

Good Morning!

Welcome to MFT&FRIENDS November 2019 Release! I feel super lucky to be invited to join them for this exciting event so I could get to know more crafty people in this loving crafting society. I always love how My Favorite Things combines variety of styles and designs for their stamps and dies. So it’s fairly quick for me to create those three cards below.

<Card 1>

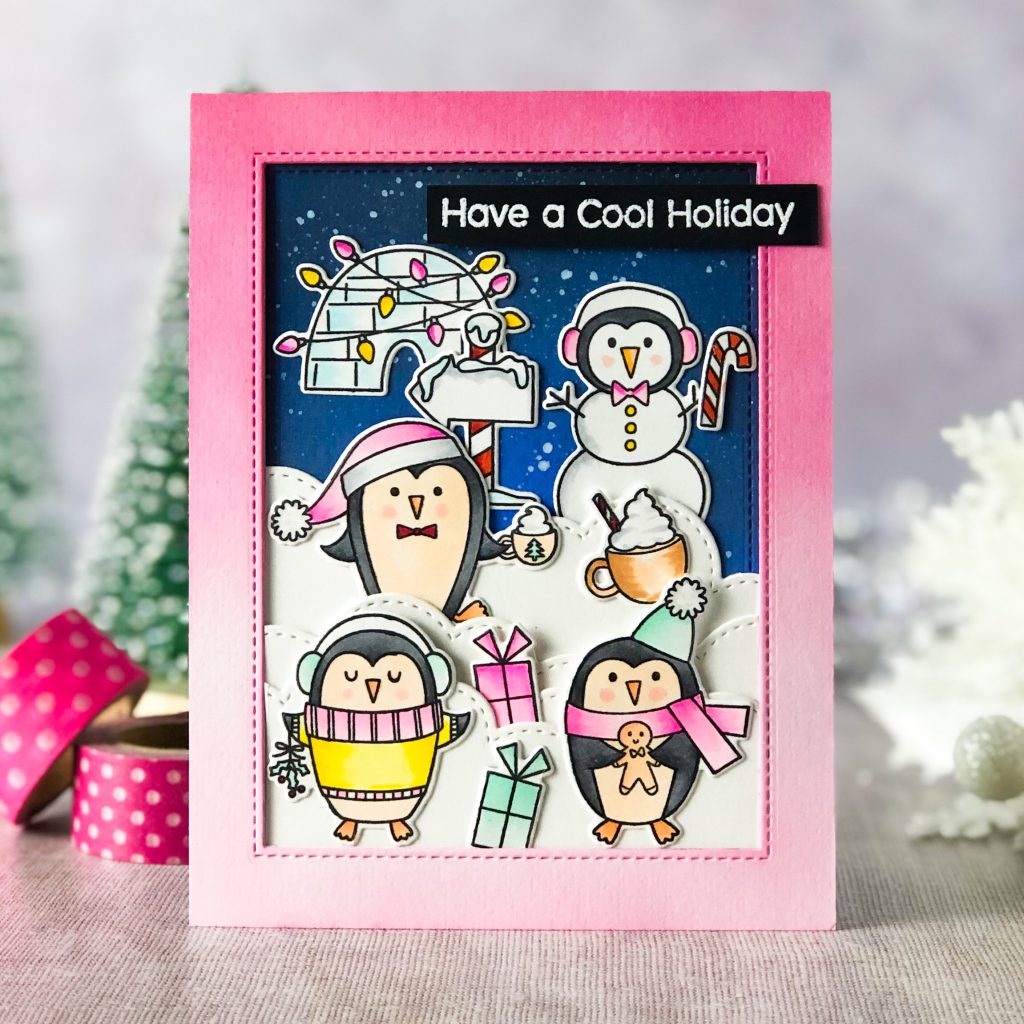
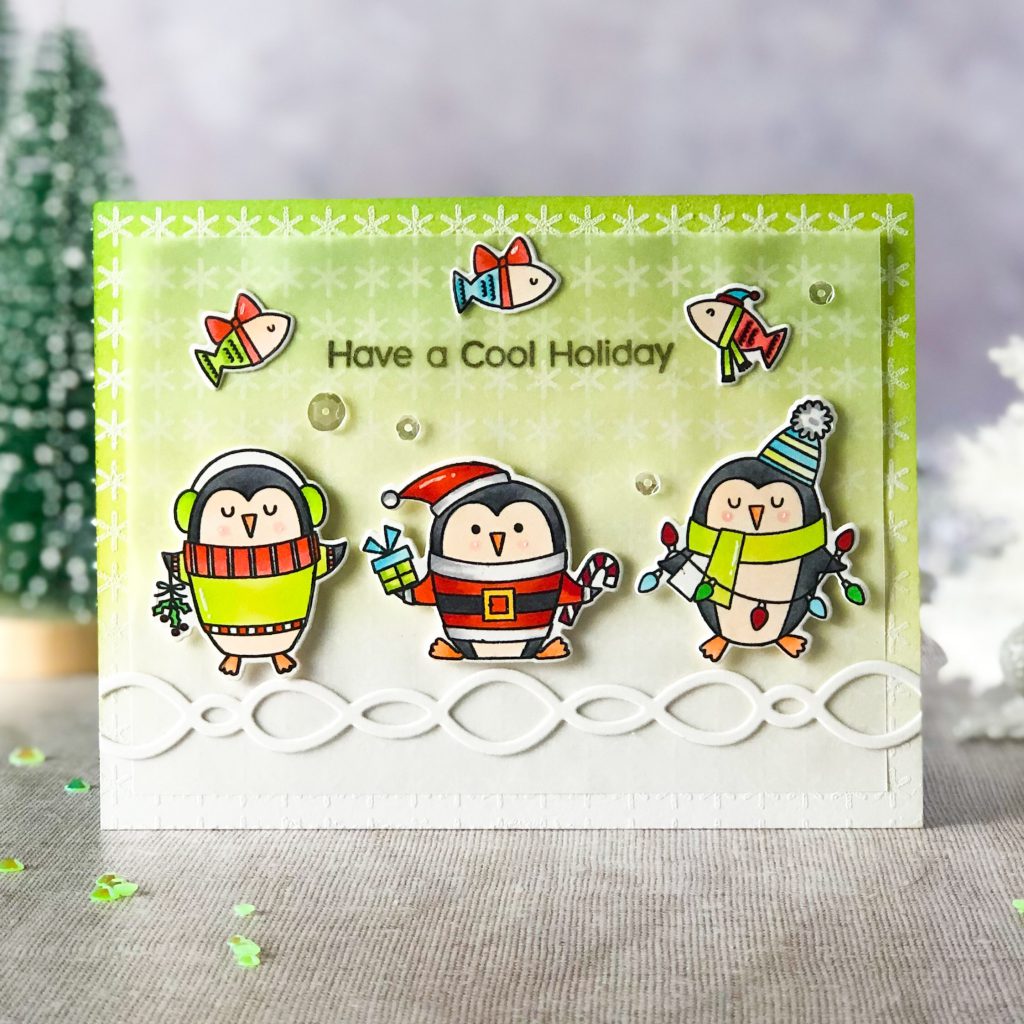
Do you believe it’s November already?! That means we’d better make sure we’ll have enough amount of Christmas cards before the holiday arrives. To start my first card, I stamped all images from Polar Penguins Stamp set using Memento Tuxedo Black ink onto Neenah solar white 80lbs card stock paper. Then I die cut them with the Coordinating Dies. I colored all images using Copic alcohol markers and set aside for later use. Since I was in a Pink Christmas mood I made sure to have add it to all accessories.

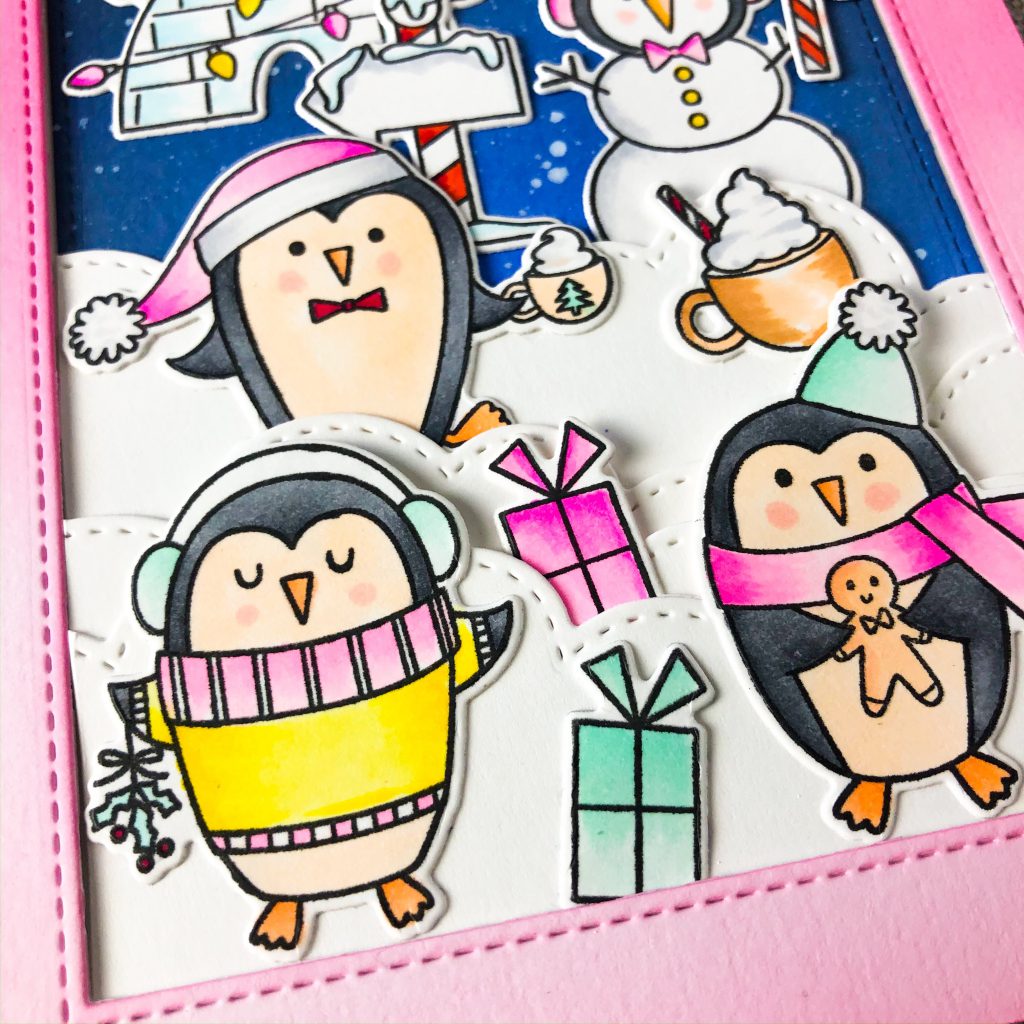
Now it’s time to prepare the frame and background scene for all characters to be in. To create the frame, I die cut my frame using Inside&Out Stitched Rectangle Stax  out of a piece of A2 sized watercolor paper. I inked the frame with Tim Holtz Distress oxide ink in Picked Raspberry to match the color scene.

To create the nighty sky. I ink blended with Tim Holtz Distress oxide ink in Blueprint Sketch and Black Soot onto the negative part of my frame die cuts.Then I splattered white watercolor paint over the background by tapping the paint brush handle. Once it’s dry, I die cut couple pieces of clouds using Stitched Cloud Edges Die-namics to mimic snow banks, then I attached it onto my inked background using liquid adhesive and foam tapes.

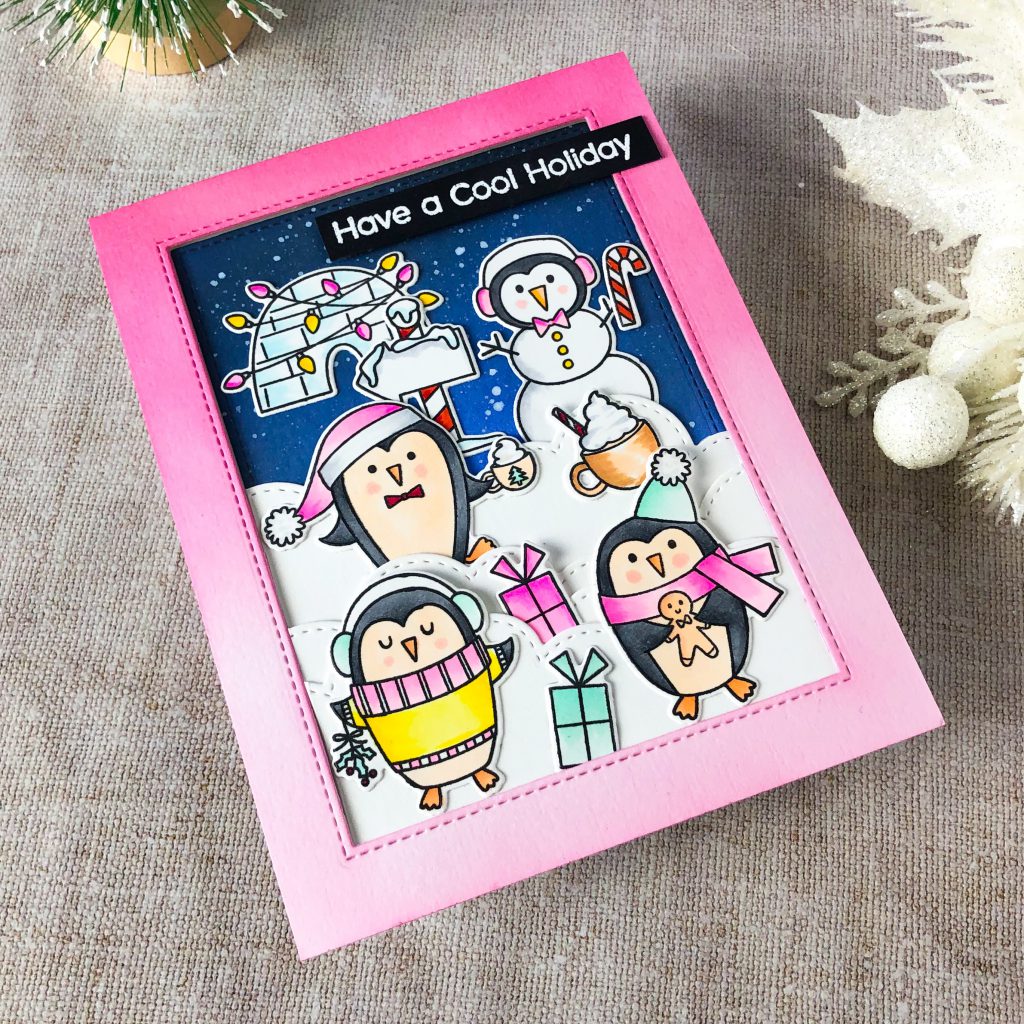
I attached all color images onto the background and white embossed the sentiment “Have a Cool Holiday” to add to this card.

<Card 2>

I love to color whole bunch of images at one time, so it is really easy to put together my second card. I went for the traditional Christmas color combo which is red and green, and I added a little bit blue to pop out of the main colors. The images are still from Polar Penguins Stamp set and cut with the Coordinating dies. As a MFT friend of this month, I got to have a few cool products to play with. I combined some of them onto this card to make it more fun.

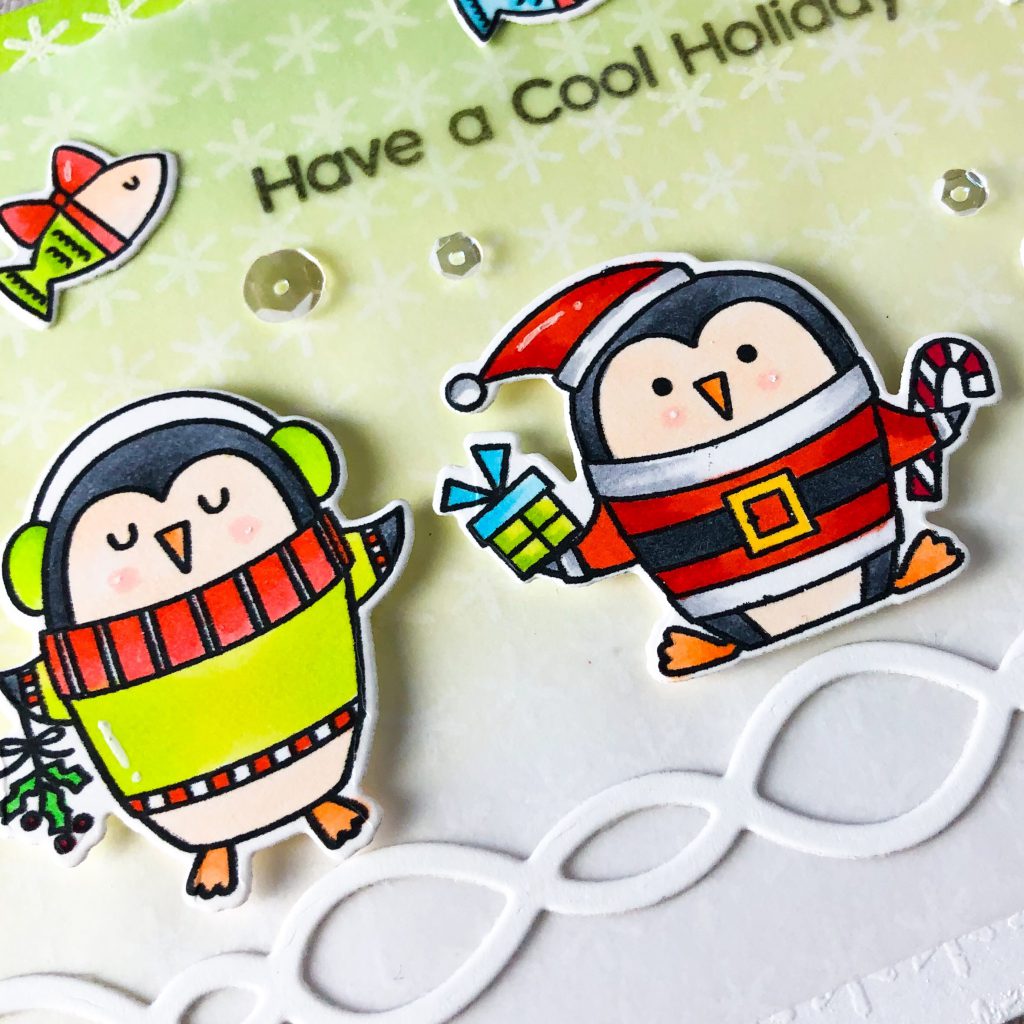
I stamped my background using VersaMark ink onto a piece of A2 sized watercolor paper and embossed with white embossing powders. Then I ink blended the background using Tim Holtz Distress oxide ink in Twisted Citron. My background is slightly busy, so trimmed a rectangle piece out of vellum paper and attached it to the center of my background. I die cut the piece using Mod Link 2 Die-namic out of white card stock and glued it onto the lower portion of my card to create snowy ground

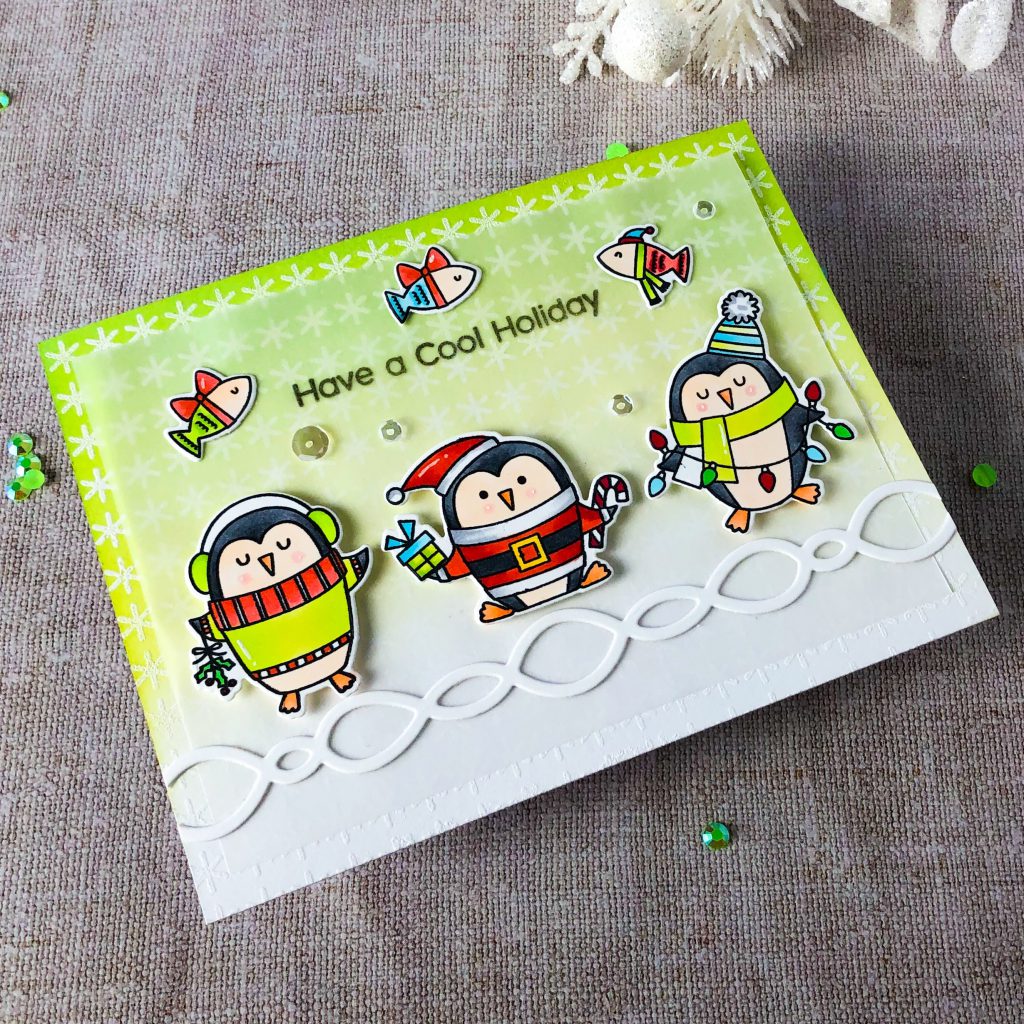
I arranged my colored images onto the background and added the sentiment “Have a Cool Holiday” by stamping and embossing with embossing powders. I finished the card with some Sparkling Clear sequins.
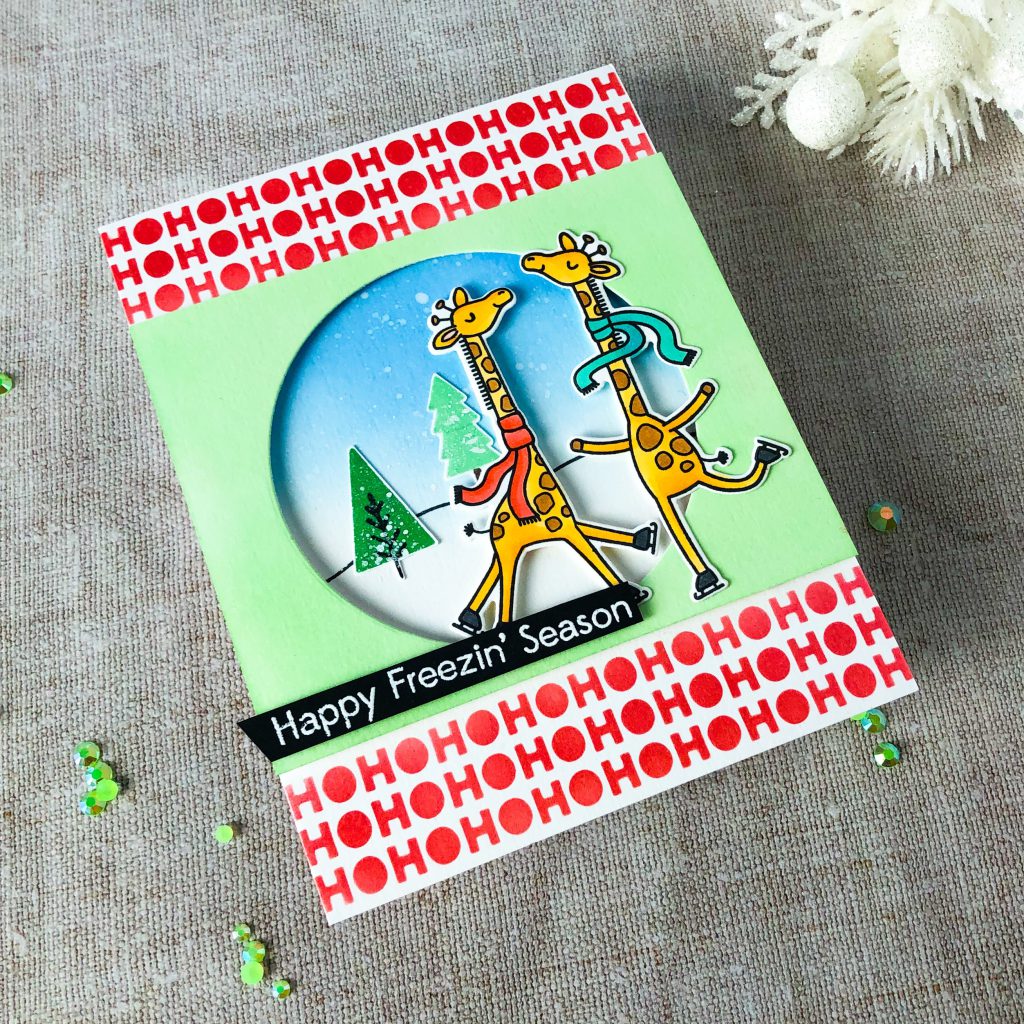
<Card 3>

Raise your hand if you love giraffes! They are so stinking cute from this new stamp set called Giraffes on Ice! Who cares if they can really ice skating or not, LOL, Anything can happen in our stamping world! To make this card, I first used one of stencils from Winter Stencil Strips to create my upper and lower pattern on the background by blending Tim Holtz Distress ink in Candied Apple over. Then I cut two pieces of 3.5″ by 4′ panels. I ink blended one with Cracked Pistachio distress oxide ink and cut the circle window using Wonky stitched Circle Stax, and I created the snowy hills and sky using the image within this stamp pairing ink blended Salty Ocean oxide ink with white paint splatters.

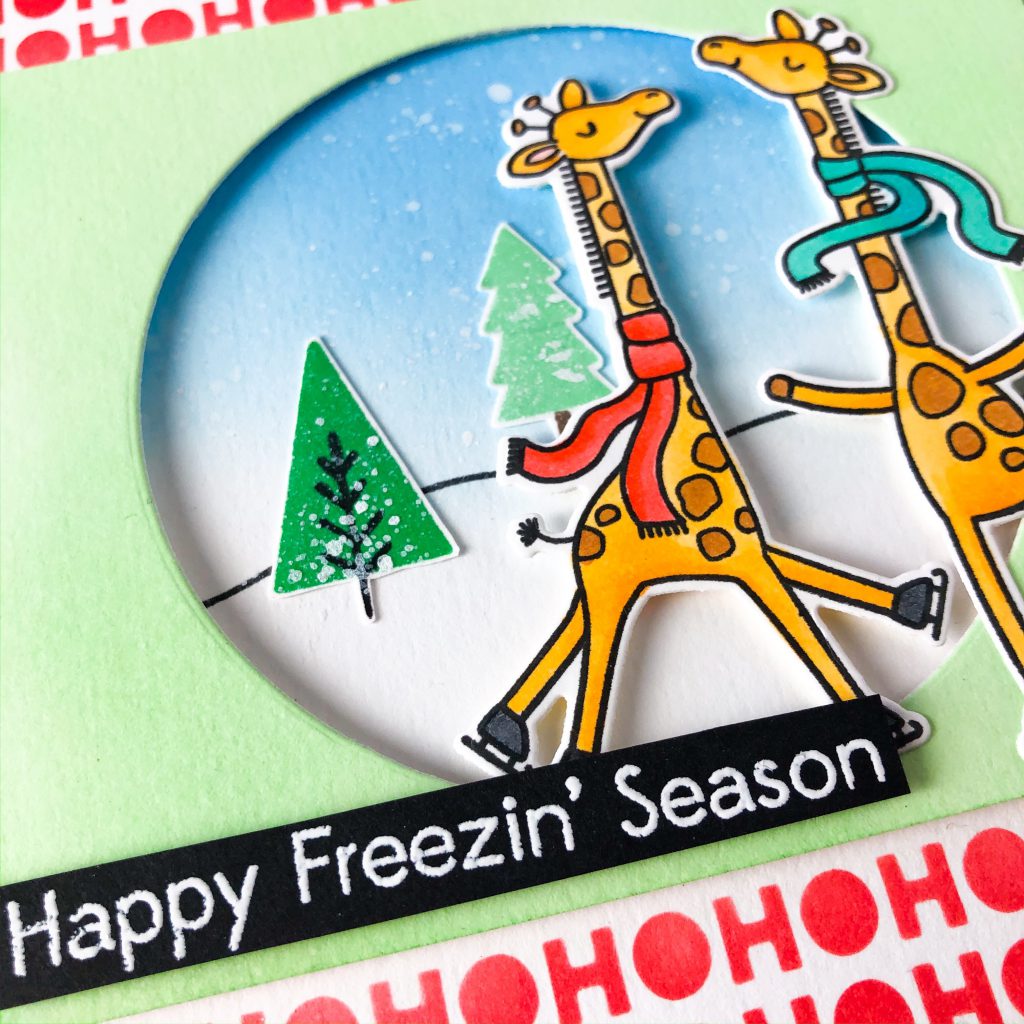
I layered the window frame over the background using foam tape and attached the whole piece onto my HoHoHo card base. The main background is made. I stamped the images from Giraffes on Ice Stamp set an die cut with the Coordinating Dies, then I arranged them onto the background. I stamped the sentiment “Happy Freezin’ Season” onto a piece of black card stock paper and embossed it with white embossing powders. Then I hand cut the strip and added it on the card for the final touch.

I am so glad to be here hanging out all of you and I hope you will have lots of fun playing with this release. Can’t wait to see what you will create!

Waffle Flower 2019 November Release Blog Hop


Welcome to Waffle Flower November 2019 Release Blog Hop! We just finished the excited Halloween, now it’s time for us to get ready for more holidays! This month, Waffle Flower is introducing two whimsical style sets:  Blessed Bear from artist Big Bear and Bird, and Winter Hamsters from illustrator Liz Mytinger.  Also new this month is the beautiful floral set Sunflower Love by illustrator Karla Jodoin.  This floral set pairs beautifully with the calligraphy style sentiment set Simply Said 1.  For those who enjoy coordinating panel dies and sentiment sets, there’s the new Herringbone Panel and Herringbone Sentiments.  Rounding out the release are the Rainbow Thank You and Cozy Cabin die sets.  For more details on the release, be sure to check out the monthly release video or check out the introductions on the Waffle Flower blog!

<Card 1>

For this card, I combined the new stamp and die from this release. I die cut all pieces out of white card stock paper using Cozy Cabin Die and inked them with distress oxide inks and Copic markers. Then I prepped the background using Tim Hotlz Distress oxide ink in Worn lipstick over a piece of A2 sized watercolor paper. I attached all die cut pieces over the background with liquid adhesive and foam tapes to create my Christmas in door scene.

Now I stamped the images from Winter Hamsters Stamp set onto Neenah Solar white 80lbs card stock paper and die cut with the Matching dies. After I colored them with Copic markers and I added them to the background. I stamped my sentiment “Warmest Wishes!” with Memento Tuxedo Black ink and added some details with white gel pen to finish my first card.

<Card 2>

I am always excited to what Big Bear and Bird is going to bring for the new release. She did not let me down at all. To start with my card, I chose to a very simple two tones background ink blending with Tim Holtz Distress oxide ink in Worn Lipstick and Twisted Citron. I splattered a mixture of Lucky Clover oxide ink and water over the lower portion of this card to create some texture.

I stamped and Copic colored the images from Blessed Bear Stamp set and die cut them with the Matching Dies. I arranged them onto my background using glue and foam tapes and finished with sentiment to the top.

<Card 3>

You cannot miss the floral illustrations in every release. We are getting to the end of fall but sunflowers are still blooming well in some of locations.  I colored the images from Sunflower Love Stamp set and die cut them with the Matching Dies. Then I stamped the sentiment “love you” from Simply Said 1 Stamp set into the frame.

Since the stamp image is fairly large and detailed, I prepared my background by ink blending with Tim Holtz Distress oxide ink ink Mermaid Lagoon and Salty Ocean pairing some ink splatters. In the end, I simply added my colored image with foam tape to the background.

<Card 4>

Here comes my last card for this blog hop. I love all graphic panel dies, they are always so easy to use for card making especially when you have some time crunch. I wanted it to be simple but not too simple, so I went for making a shaker card. First of all, I ink blended my background onto a piece of A2 sized watercolor paper using Tim Holtz Distress oxide ink in Picked Raspberry and Blueprint Sketch. Then I splattered tons of white watercolor paint over it to create snowflakes effect. Once it’s dry, I die cut the panel using Herringbone Panel Die. I stamped the sentiment “Keep the Faith” from Herringbone Sentiment Stamp set using VersaMark ink and embossed with white embossing powders.

I poured  lots of Spark! white tassel glitters to the card base and I added my prepped front panel over it with thicker foam strips. At last, I added some of enamel dots from Waffle Flower Clean & Clear Enamel Dots.

Now Hop With US!

Waffle Flower     

Cathy Zielske     

Amy Rysavy

Jessica Frost Ballas 

Keeway Tsao

Channin Pelletier 

Rebecca Keppel

Alix Davis (You’re Here)

JJ Bolton    

Promotions:

  • To celebrate the blog hop, Waffle Flower is giving away $25 gift certificates to THREE lucky winners. You can leave a comment on this blog and along the hop by 11:59pm ET on 11/7/19 for your chances to win. Winners will be chosen at random from the comments left on any of the posts in this blog hop and will be announced on the Waffle Flower blog on 11/9/2019.

Receive a FREE Mystery Gift with all orders $50 and over, while supplies last.